Chris' Rev4 TRD Turbo...
Moderators: IMOC Moderators, IMOC Committee Members
Re: Chris' Rev4 TRD Turbo...
that latest rain tray is pretty impressive. . I really wasn't a fan of the other ones but the new artwork is really cool, I don't think I'm quite ready for artwork on mine but this has inspired me to paint it white
-
Chris_9011
- Posts: 510
- Joined: Thu Apr 26, 2007 10:32 am
- Location: West Midlands
Re: Chris' Rev4 TRD Turbo...
More done over the weekend... took a trip to Northampton to see a fellow MR2 owner club member, we had arranged to swap over intercooler pipework as I had red silicon hoses (that he wanted), and he had purple silicon hoses (that I wanted)... now obviously with mine being my daily driver I needed to change them over quickly so I still had use of the car... only took around 1 1/2 hours to complete on Jay's drive:
before:
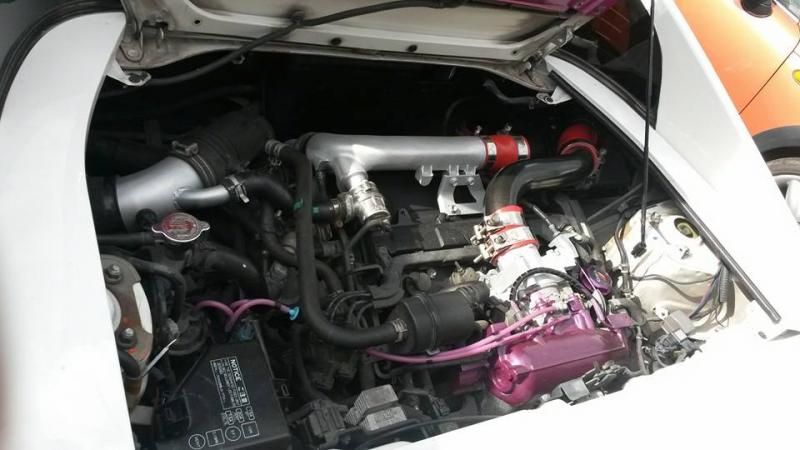
after:
as you can see, it makes such a difference and the colour coding is pretty much all matching now(purple, black, silver)
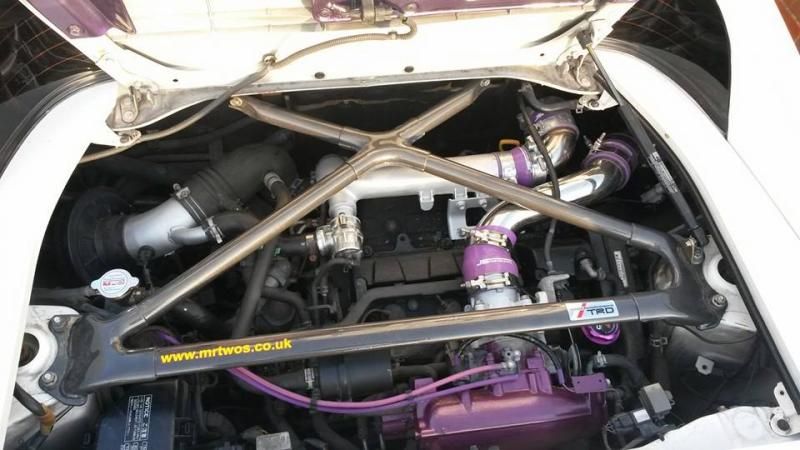
...and due to the silicon hoses being of a slightly different design, I was finally able to re-fit my TRD brace:
:yahoo:
...it's a VERY snug fit underneath the brace, but it works, and the throttle cable is also no longer stretched underneath the hard pipes, it now fits perfectly over the top of the 'new' hard pipes
All in all, a very productive weekend work
:th:
before:
after:
as you can see, it makes such a difference and the colour coding is pretty much all matching now
All in all, a very productive weekend work
Last edited by Chris_9011 on Mon Mar 30, 2015 10:53 am, edited 1 time in total.
Re: Chris' Rev4 TRD Turbo...
Lovely looking car  . Some very interesting and original one off mods going on.
-
Chris_9011
- Posts: 510
- Joined: Thu Apr 26, 2007 10:32 am
- Location: West Midlands
Re: Chris' Rev4 TRD Turbo...
well, it's taken 9 months of 'too'ing and fro'ing' but I finally got my hands on my black head-liner today... the back story is that I bought a black tin-top head-liner from Craig (RedMR2) over on IMOC 9 months ago. His car was being broken for parts and moved into a new T-bar shell at Peter Gidden's place (SBits).
Due to the nature of the thing, the head-liner is a very fragile item that Peter said that he'd not post just in case it got damaged(which is fair enough). After a few failed attempts over those 9 months to get it down to me, I finally spotted the Two Brutal Transportation System over on TwoBrutal (obviously) and posted yesterday morning. Luckily a member was up in York and travelling past Barnsley and spotted the thread 20 minutes after I posted, so he said he'd pick it up for me... and even better was his house was only 25 miles away from me so I went and got it after work last night...
...and then I got home and fitted it within an hour
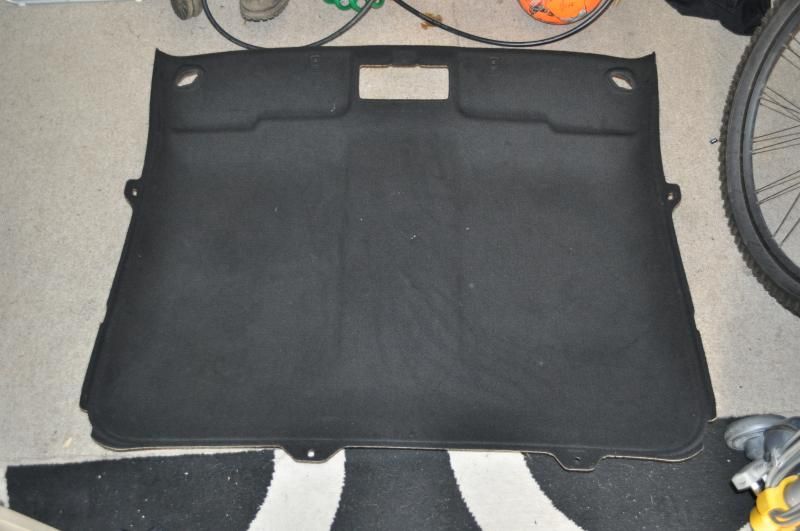
out with the old grey head-liner:
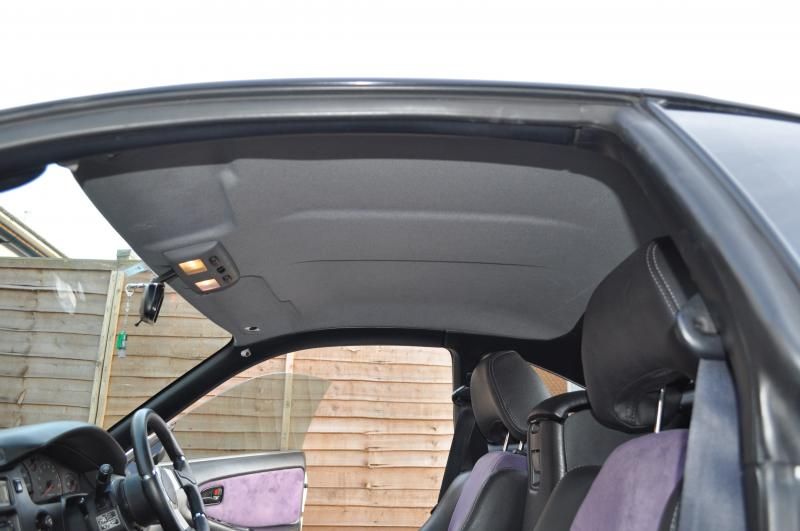
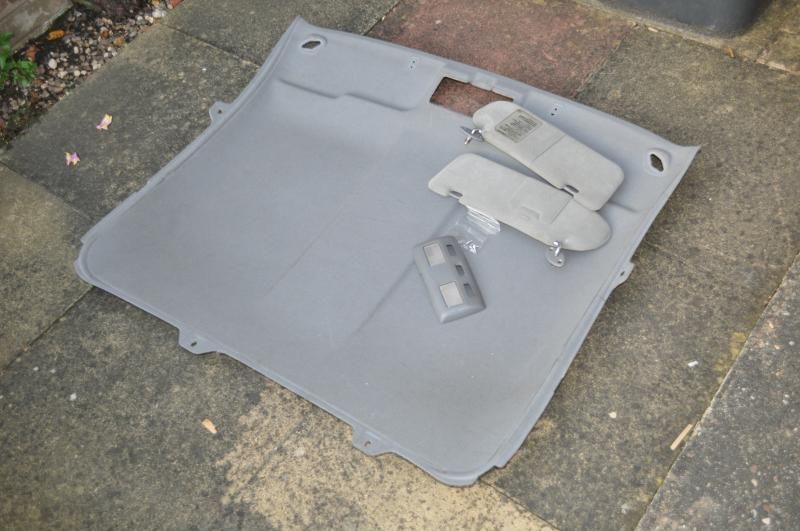
and in with the new black head-liner:
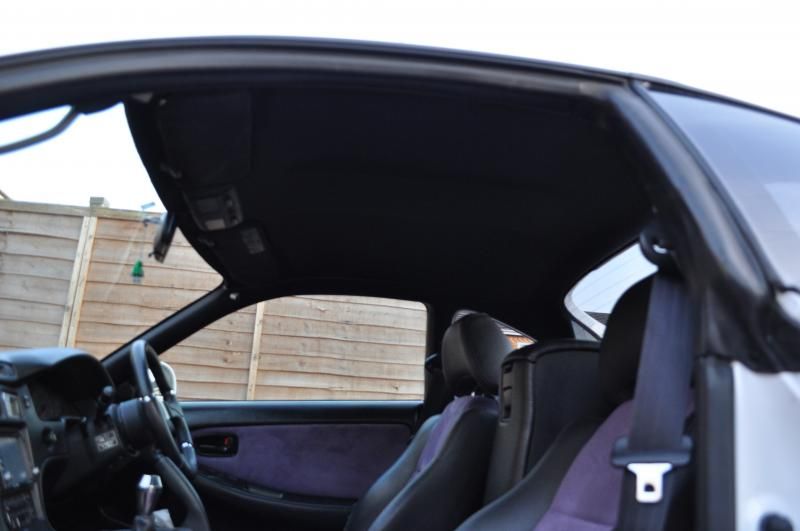
I've obviously been collecting parts over the past 9 months too as I've also swapped out the courtesy light cover and sunvisors for black ones too:th:
I would like to point out that I hold no person responsible for the time it took to get it down to me, everyone involved did everything they could. It was probably mostly my fault for the long wait as I needed to get off my backside and go and fetch it myself...
...I also removed my sponge material from the sills whilst I had the interior apart:
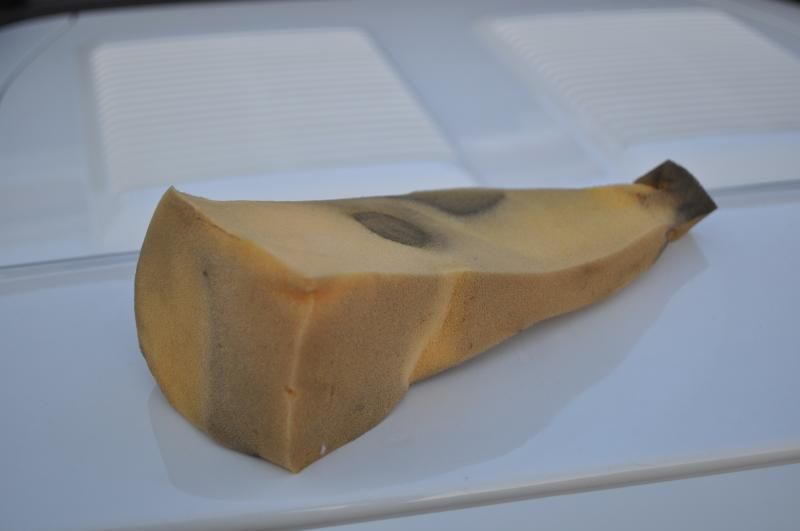
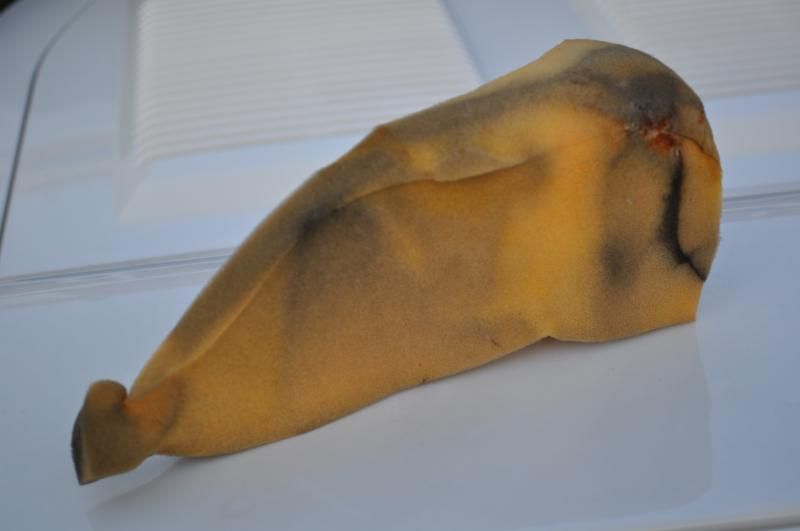
...and found absolutely no moisture 
Due to the nature of the thing, the head-liner is a very fragile item that Peter said that he'd not post just in case it got damaged
out with the old grey head-liner:
and in with the new black head-liner:
I've obviously been collecting parts over the past 9 months too as I've also swapped out the courtesy light cover and sunvisors for black ones too
I would like to point out that I hold no person responsible for the time it took to get it down to me, everyone involved did everything they could.
Re: Chris' Rev4 TRD Turbo...
Looking great Chris I'm quite shocked that it only took an hour to do the headlining. Good work there.
....and that engine bay looks very sexy 
Draven wrote
http://www.imoc.co.uk/forums/viewtopic. ... sc&start=0
Re: Chris' Rev4 TRD Turbo...
Appreciate this is prob a laughable newbie question but where are those foam pads in the sills located
Re: Chris' Rev4 TRD Turbo...
F9_adm wrote:Appreciate this is prob a laughable newbie question but where are those foam pads in the sills located
If you take the interior trims off that cover the seat belt
My TRD WIDEBODY build thread http://www.imoc.co.uk/forums/viewtopic.php?t=164957
Re: Chris' Rev4 TRD Turbo...
Looks good.
RE the dry sponges. I winder if this is a tin top thing? Mine where dry and sills are mint. Lack of drain tubes from T-bars?
RE the dry sponges.
-
Chris_9011
- Posts: 510
- Joined: Thu Apr 26, 2007 10:32 am
- Location: West Midlands
Re: Chris' Rev4 TRD Turbo...
Torero wrote:Looking great Chris
Cheers John
Yep, I got my daughter to bed by 8.00pm, had a quick ciggy and then got cracking at around 8.05pm.
-
Chris_9011
- Posts: 510
- Joined: Thu Apr 26, 2007 10:32 am
- Location: West Midlands
Re: Chris' Rev4 TRD Turbo...
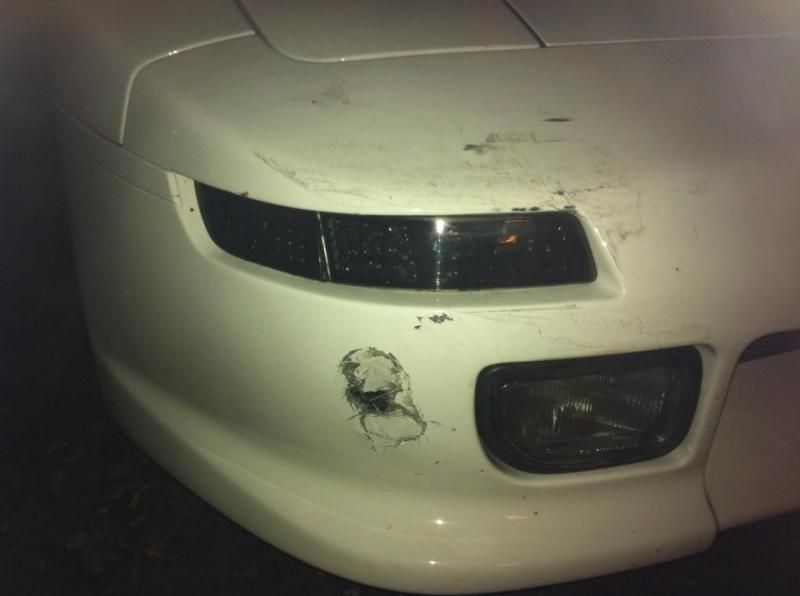
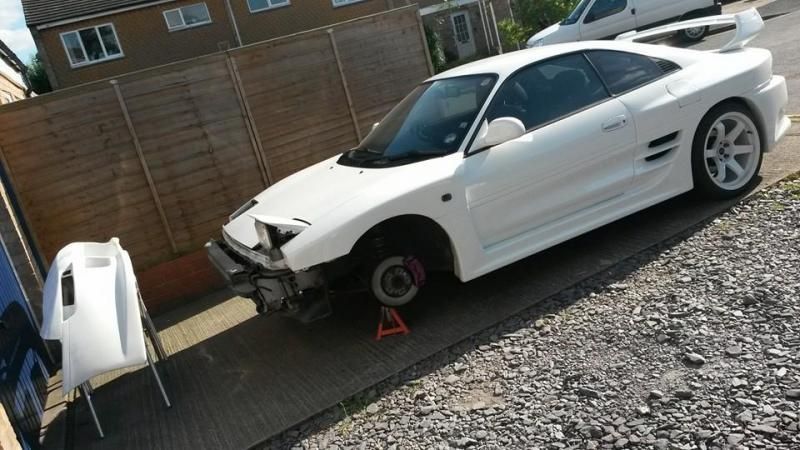
I took Thursday and Friday off last week to get a job done that's been waiting to be sorted for the last 8 months... repair the front bumper
Some of you may remember, in October last year I unfortunately ran into the back of a Peugeot 206 at low speed. It didn't do a great deal of damage other than the exhaust of the Peugeot puncturing a hole in the bumper, a small hole in the top, and some cracking around the indicator unit:
Thursday morning lead me to Halfords for a few items:
- fibreglass repair kit
- aluminium repair mesh
- plastic panel filler
- white plastic primer
- 040 super white spray can
- loads of different grades of wet & dry
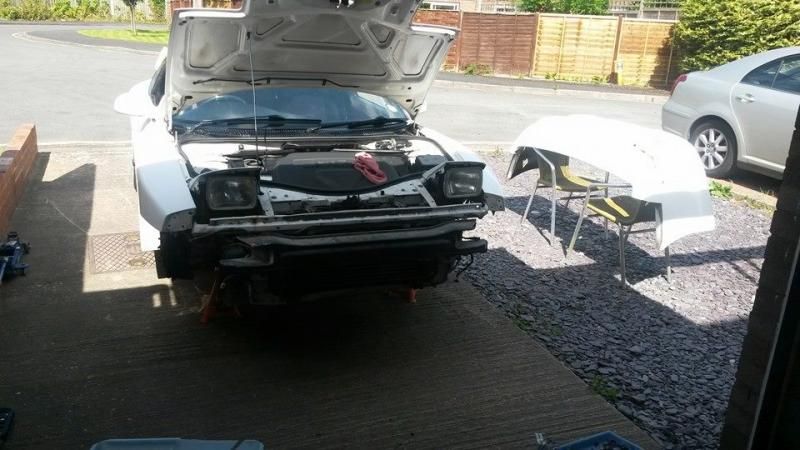
By lunchtime on Thursday I'd removed the front bumper from the car...:
...and cut the excess broken fibreglass out of the damaged section, and sanded the areas down
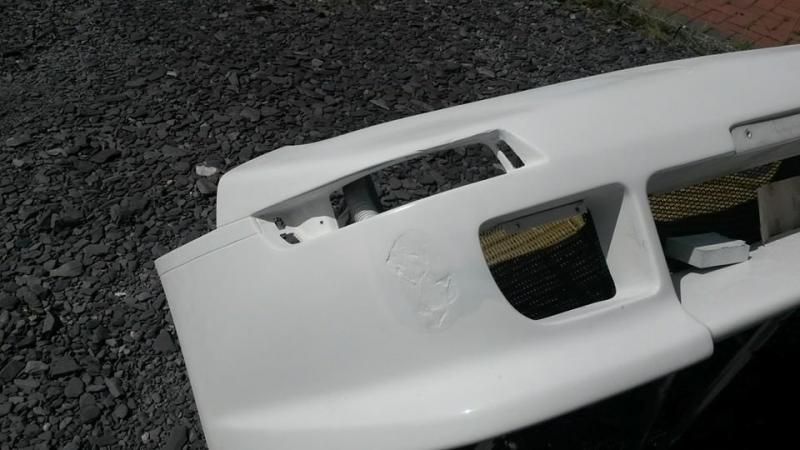
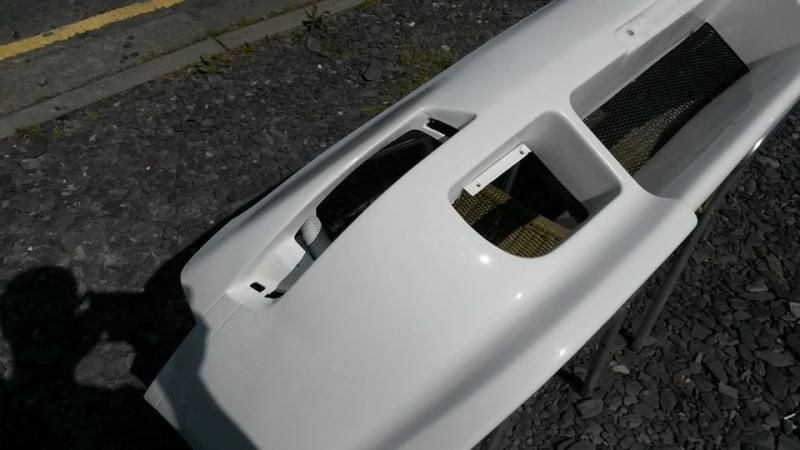
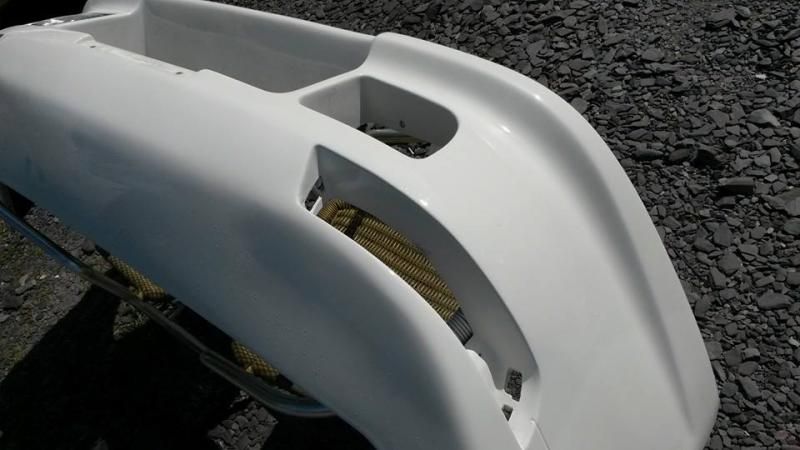
Unfortunately at this point, I offered up the replacement bumper that I'd sourced but it was around 5-10mm short of fitting flush to the wing/wheel arch on both sides so I decided to repair the original(hence buying all the products above before taking the car apart (always thinking ahead  )
)
At this stage, I mixed a little resin to bond the aluminium mesh onto the back of the large hole, and then started using fibreglass sheet over the top of that to secure it in place properly and make it as strong as before the damage.
At this stage, I also re-inforced the back of the other damaged sections with fibreglass and a shed load of resin
Once the fibreglass had set sufficiently I then filled the hole using the plastic bumper filler to fill the hole as much as I could and left it to set. I also filled the small hole on the top, and the large crack around the indicator unit.
I waited for it to cure sufficiently and then sanded it down... I then primered it and waited for that to dry to see the high and low spots...
At this stage, Thursday was nearly over and I had to go and pick my daughter up from school so I had a quick tidy up and left the car like this overnight:
Friday morning:
So, after getting the majority of the work done on Thursday, all I had to do is finish off getting the filler smooth and pit-free... there were one or two parts of the filler that weren't quite smooth enough for my liking. So I used a small skim of filler over these sections, waited for it to dry and then sanded... I did this a couple more times until I was happy. Then once these were done, I used a variety of grades of wet & dry (240 - 400 - 800 - 1200, and finally 1200 + wet) to completely smooth the surface ready to paint... a quick clean down, and then some pre-paint wipes cleaned the surface, and I was ready for the primer...
Once the primer was set, I used 1200 grit wet& dry with water to smooth the primer... cleaned it all up again, and then layed the 040 paint down using the Halfords spray paint (I wasn't looking for a perfect paint finish as it's going in to get professionally done in the next few weeks):
Whilst the paint was curing, I tackled the repair where the wing had broken off it's mounting point... good old cable ties secured it temporarily, and then a couple more nuts and bolts in a couple of places made it strong again.
The paint had set enough to man handle it, so I carefully started the re-assembly:

Once I had the car back together, I was able to turn it around on the driveway to let the hot sun get to the paintwork to help it to set properly overnight...
On the Saturday, I was then able to get the rubbing compound(paint renovator) out on the
repaired and repainted section... unfortunately the paintwork has come up a little dull... but at least it's all one colour, and doesn't have a bloody great hole in the front now:
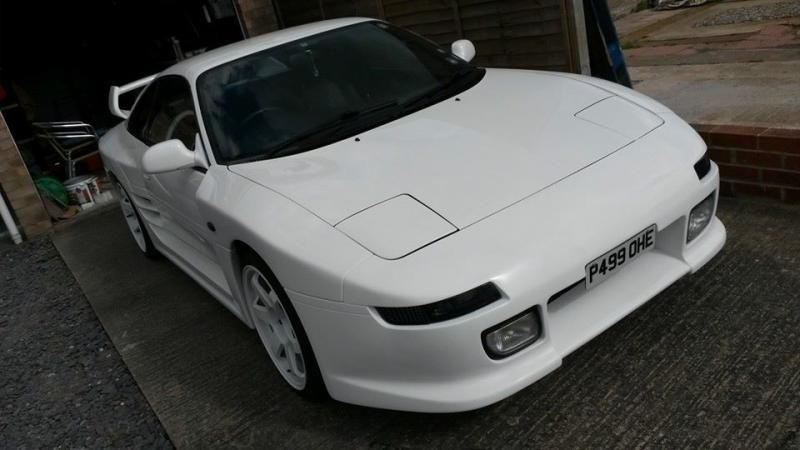
I think that once it goes into the paintshop, and the paint body work chap gets hold of it and can fill and sand it properly, as well as paint it properly in a booth... it'll be almost back to 100%
overall, I'm pretty happy with my work
Some of you may remember, in October last year I unfortunately ran into the back of a Peugeot 206 at low speed.
Thursday morning lead me to Halfords for a few items:
By lunchtime on Thursday I'd removed the front bumper from the car.
Unfortunately at this point, I offered up the replacement bumper that I'd sourced but it was around 5-10mm short of fitting flush to the wing/wheel arch on both sides so I decided to repair the original
At this stage, I mixed a little resin to bond the aluminium mesh onto the back of the large hole, and then started using fibreglass sheet over the top of that to secure it in place properly and make it as strong as before the damage.
At this stage, I also re-inforced the back of the other damaged sections with fibreglass and a shed load of resin
Once the fibreglass had set sufficiently I then filled the hole using the plastic bumper filler to fill the hole as much as I could and left it to set.
I waited for it to cure sufficiently and then sanded it down.
At this stage, Thursday was nearly over and I had to go and pick my daughter up from school so I had a quick tidy up and left the car like this overnight:
Friday morning:
So, after getting the majority of the work done on Thursday, all I had to do is finish off getting the filler smooth and pit-free.
Once the primer was set, I used 1200 grit wet
Whilst the paint was curing, I tackled the repair where the wing had broken off it's mounting point.
The paint had set enough to man handle it, so I carefully started the re-assembly:
Once I had the car back together, I was able to turn it around on the driveway to let the hot sun get to the paintwork to help it to set properly overnight.
On the Saturday, I was then able to get the rubbing compound
repaired and repainted section.
I think that once it goes into the paintshop, and the paint body work chap gets hold of it and can fill and sand it properly, as well as paint it properly in a booth.
overall, I'm pretty happy with my work
Last edited by Chris_9011 on Mon Mar 30, 2015 10:54 am, edited 1 time in total.
Re: Chris' Rev4 TRD Turbo...
Nice work on the bumper mate, good temporary fix, till it gets professionally sorted. Headlining looks good too.
-
Chris_9011
- Posts: 510
- Joined: Thu Apr 26, 2007 10:32 am
- Location: West Midlands
Re: Chris' Rev4 TRD Turbo...
RedMR² wrote:Nice work on the bumper mate, good temporary fix, till it gets professionally sorted.
Cheers Craig
-
Chris_9011
- Posts: 510
- Joined: Thu Apr 26, 2007 10:32 am
- Location: West Midlands
Re: Chris' Rev4 TRD Turbo...
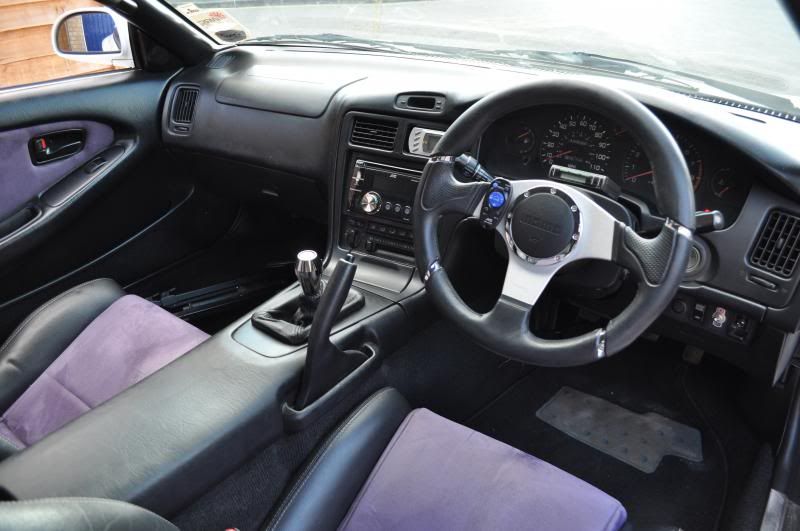
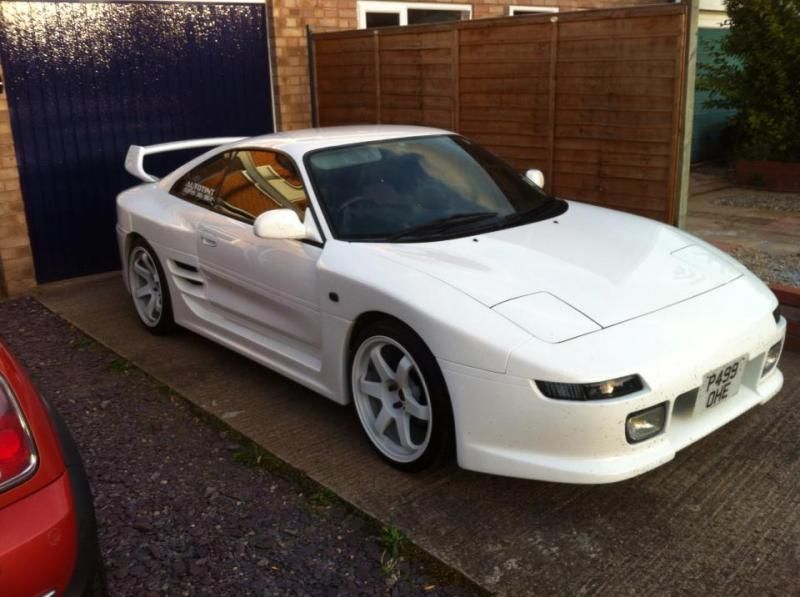
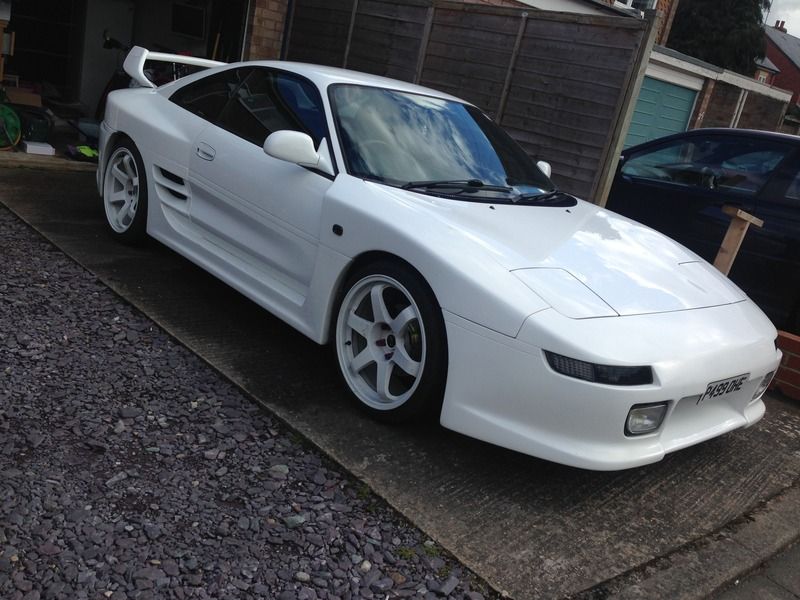
Blimey, been a while since and update on this... not much to report other than the fitting of some new seats and door cards...
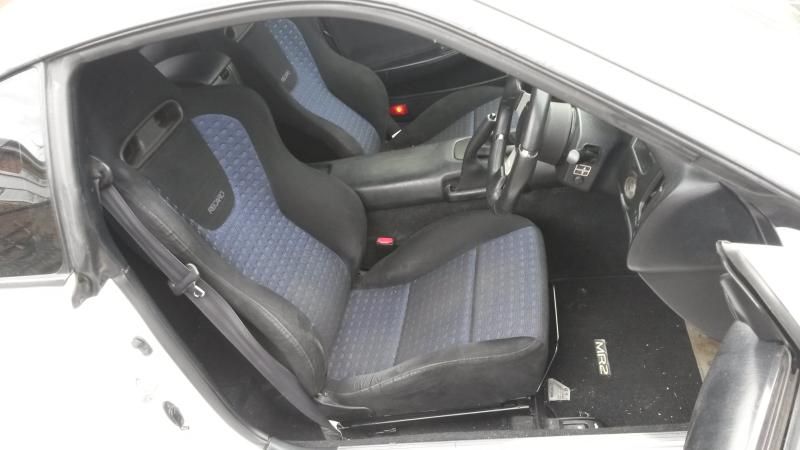
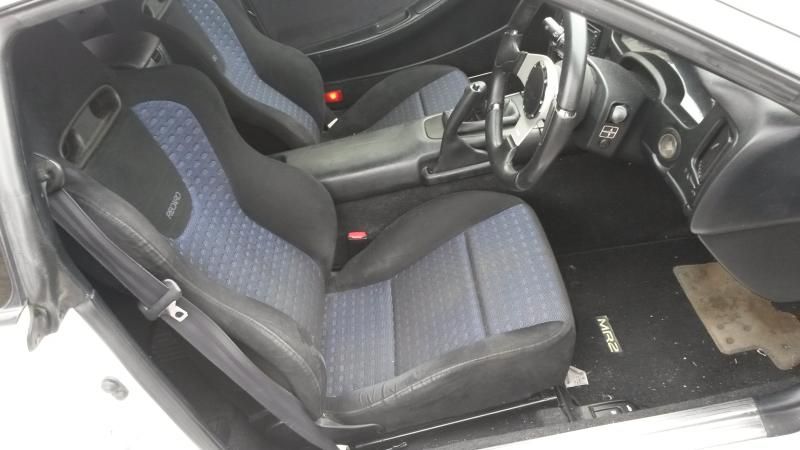
Seats are Recaro Sport Topline, from a Mitsubishi Evo 8... mounted on a custom subframe (that was made by Peter at SBits)... and the door cards are standard black cloth from a rev3 import. The seats are perfect, with no wear or tears either
A nice swap deal for my purple seats and door cards for this little lot...
and after a nice 120 mile journey home from fitting them, I can report that my usual'bad-back after a long journey' was no where to be seen/felt :th:
just got to give them a bit of a clean up, and all should be good... :cool1:
Seats are Recaro Sport Topline, from a Mitsubishi Evo 8.
A nice swap deal for my purple seats and door cards for this little lot.
and after a nice 120 mile journey home from fitting them, I can report that my usual
just got to give them a bit of a clean up, and all should be good.
Re: Chris' Rev4 TRD Turbo...
They look fantastic mate, glad you're happy with them
-
Chris_9011
- Posts: 510
- Joined: Thu Apr 26, 2007 10:32 am
- Location: West Midlands
Re: Chris' Rev4 TRD Turbo...
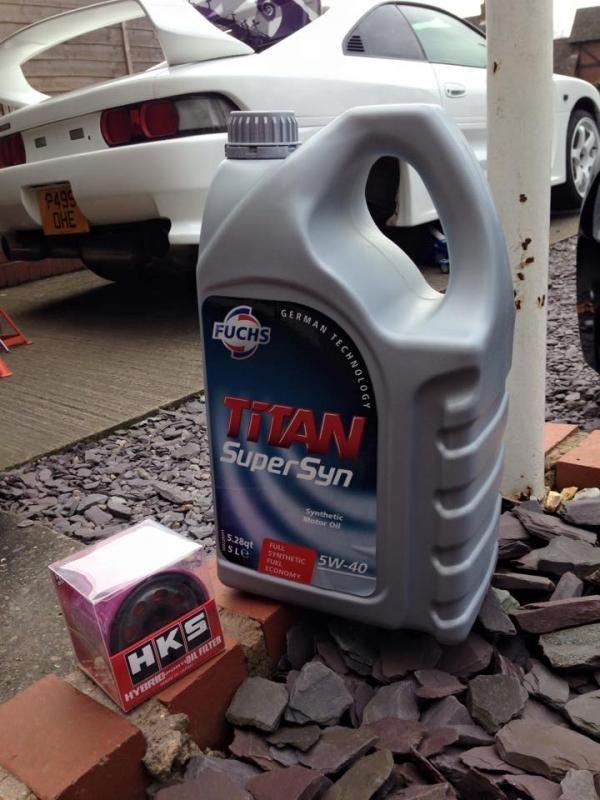
Got the oil and filter changed... plus fixed the intercooler spal fan, that had seized with rust...
plus I gave it a wash
...and I thought I may as well give the wife's car a once over too :rolleyes:
plus I gave it a wash
-
Chris_9011
- Posts: 510
- Joined: Thu Apr 26, 2007 10:32 am
- Location: West Midlands
Re: Chris' Rev4 TRD Turbo...
So, i've just been through my entire thread and fixed all the broken image links... whilst i was doing this I noticed a few missing modifications from the past year.
1)
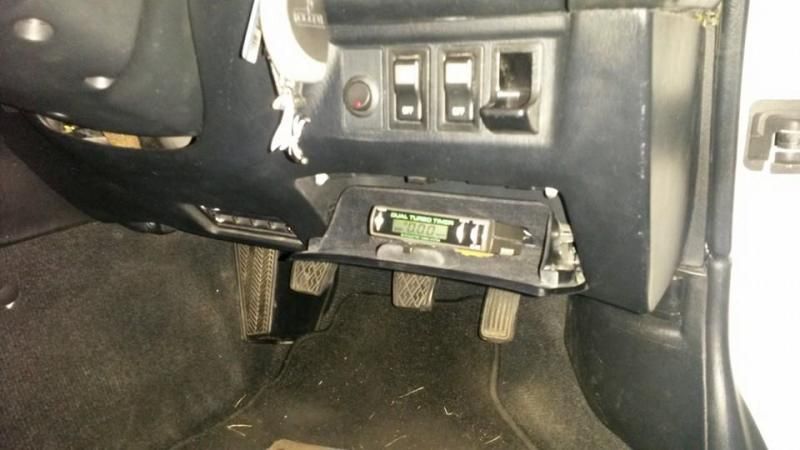
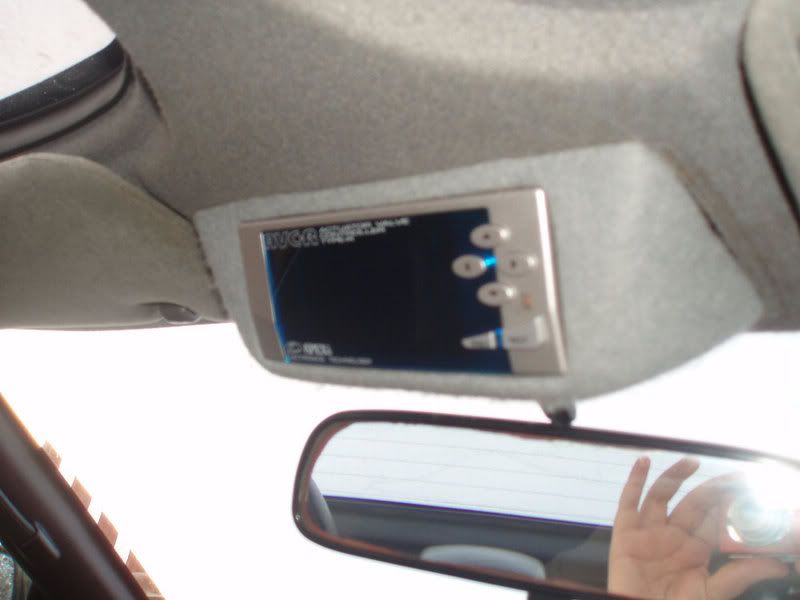
I relocated the Blitz turbo timer into the coin tray cubby from where it was on top of the steering wheel cowling:
Before:
During:
After:
2)
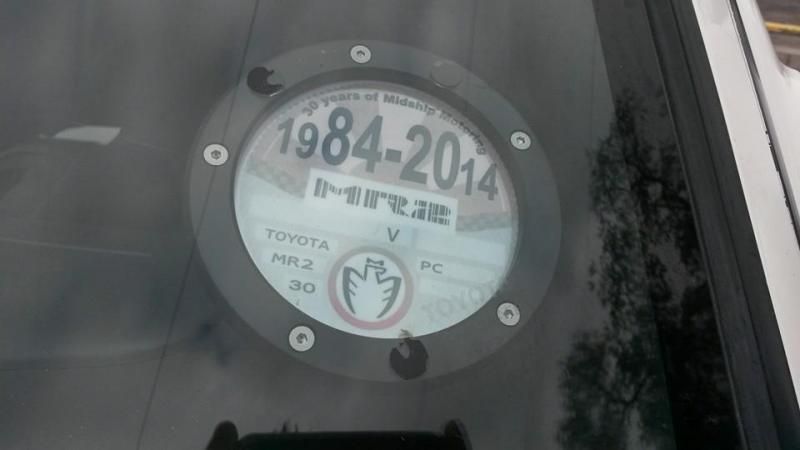
30th Anniversary Tax Disc:
3)
MK3 spare wheel cover:

4)
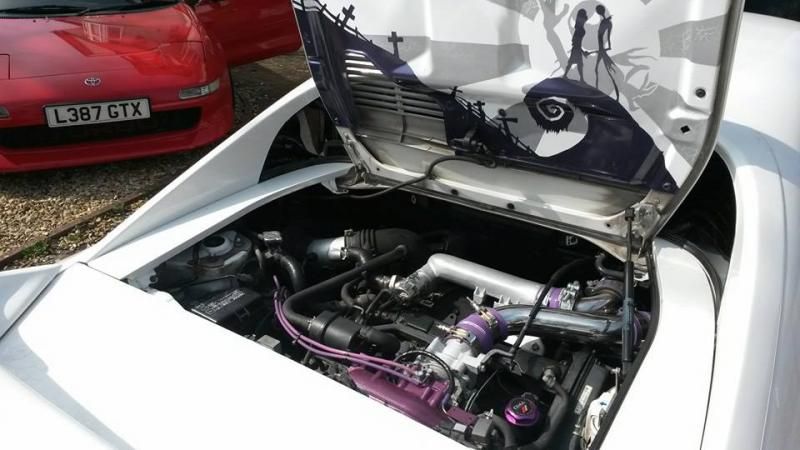
Engine colour coding:
5)
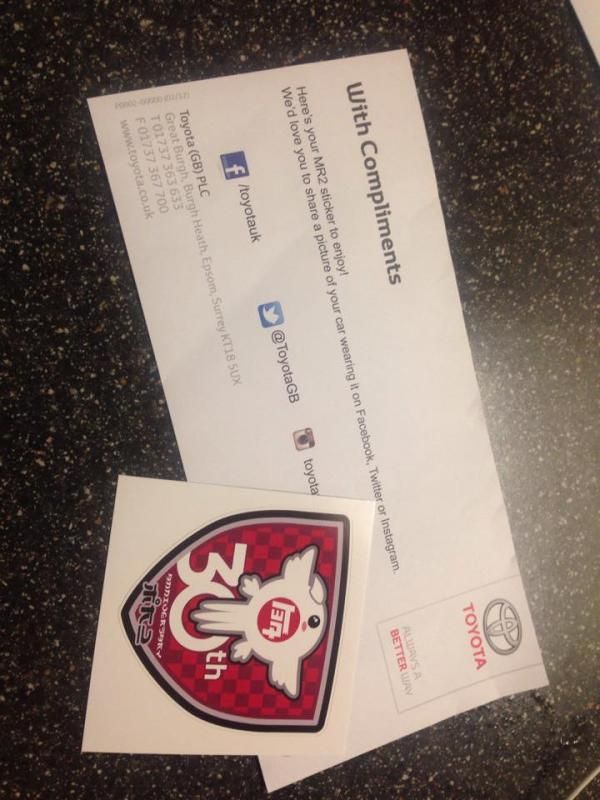
30th Anniversary Sticker(from Toyota GB):
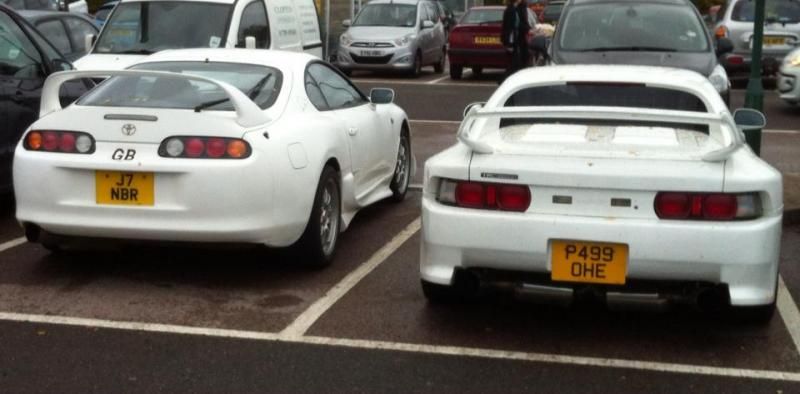
the car also found a friend in the supermarket car park:
1)
I relocated the Blitz turbo timer into the coin tray cubby from where it was on top of the steering wheel cowling:
Before:
During:
After:
2)
30th Anniversary Tax Disc:
3)
MK3 spare wheel cover:
4)
Engine colour coding:
5)
30th Anniversary Sticker
the car also found a friend in the supermarket car park:
-
Chris_9011
- Posts: 510
- Joined: Thu Apr 26, 2007 10:32 am
- Location: West Midlands
Re: Chris' Rev4 TRD Turbo...
I have done a few things over the past few months
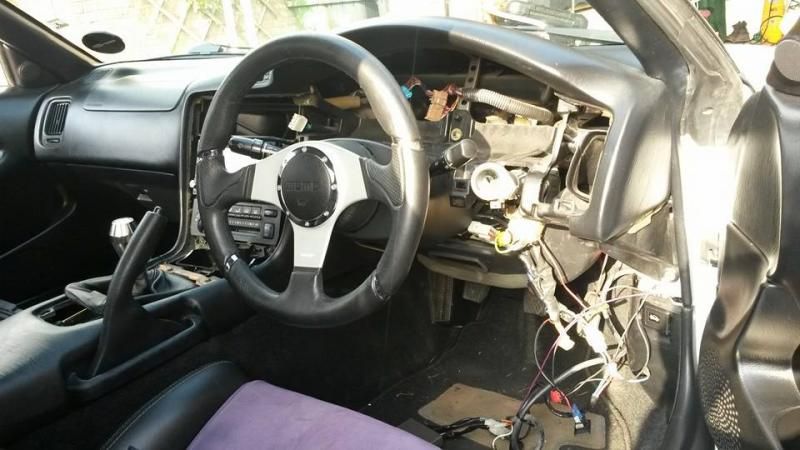
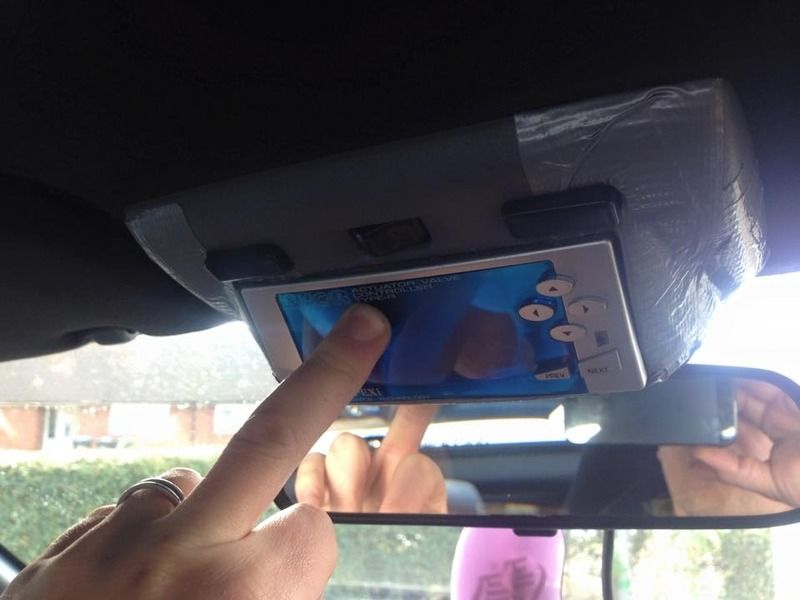
firstly, I want to return my dash to a stock look, so I needed to find somewhere to relocate the AVCR control unit.
There are a few of these types of things knocking around, and I got my inspiration from this style:
I had a spare grey interior light unit from when I changed over my headlining, sun visors and light to black and decided to try and get it fitted in there. Now, I also wanted to include the interior lights still in the same unit so I would also need to keep the interior light switches in with the same unit... I first tried to get the initial concept somewhere right with the use of plastic and duct tape, the end results were promising:
Once I had the initial design finalised, I broke out the fibreglass and resin and made the finished part. Once this was set, I then filled it with plastic filler and started to sand it smooth...
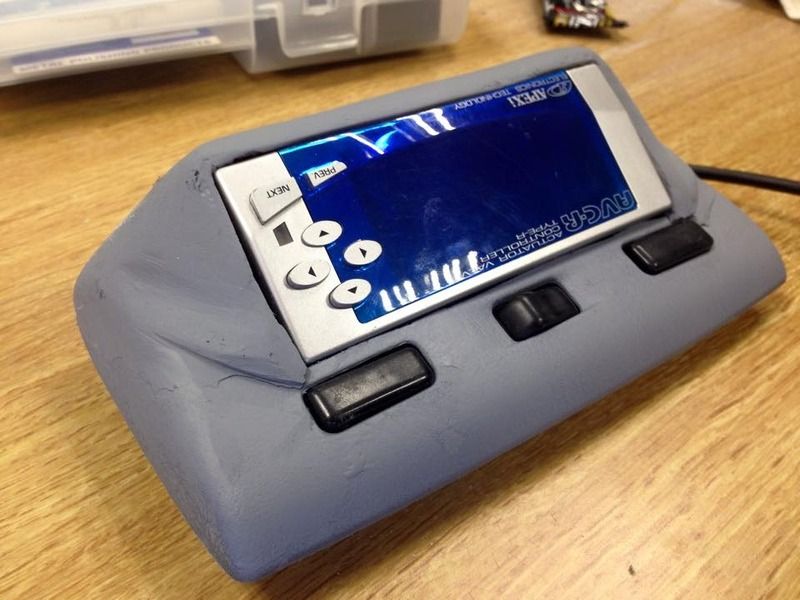
Once it was smooth and correct, it had a few coats of matt black paint to finish the look and to complement my black headliner and sun visors. It dried overnight and was then fitted
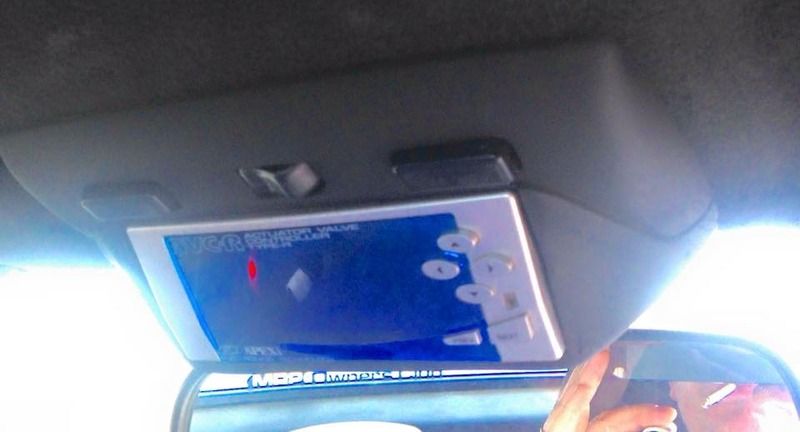
Looks just like it was meant to be there...
One last thing to worry about is to get some LED lights fitted in it at some point in the near future, something for another day though... I just need to figure about the best place to fit them and then wire them in...
With the highland drive fast approaching(leaving for Scotland 2 weeks on Wednesday), the brakes just weren't up to scratch and it's been something that I've been meaning to get changed for a little while now... so Saturday morning at 9am, with the help of PeteV6R5 (my Dad), we got cracking...
Here's a few little bits that arrived the week before that were due to be fitted:
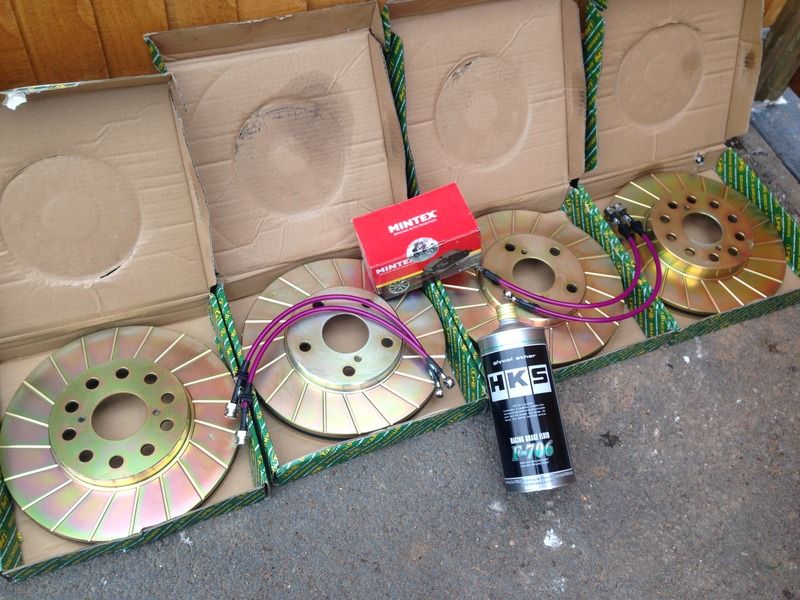
- CRN grooved discs front and rear
- Mintex pads front and rear
- Braided brake lines
- HKS racing glycol ether racing brake fluid
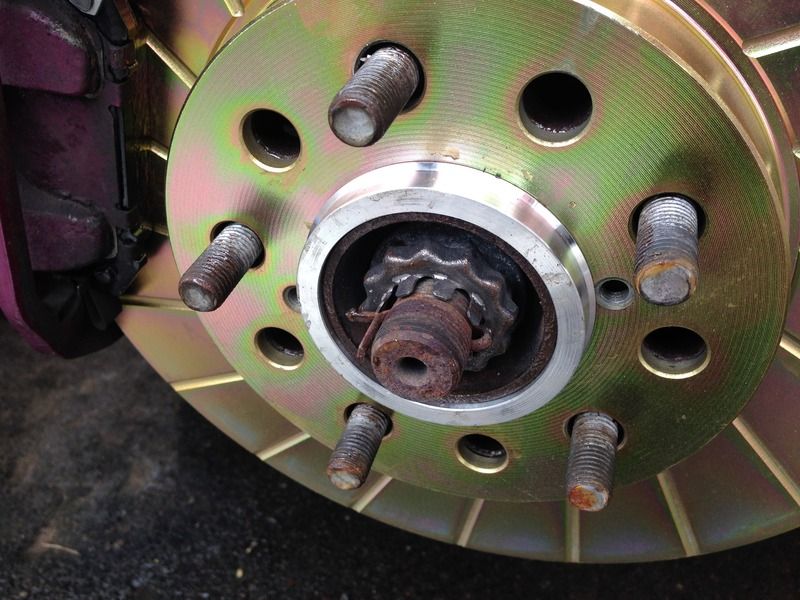
So, we started well, got the car in the air and removed the rear brakes... Dad on one side, and me on the other. We managed to get the old discs and pads removed, cleaned everything up and got everything greased up with proper brake grease. Then the new discs and pads were refitted and caliper re-fitted...
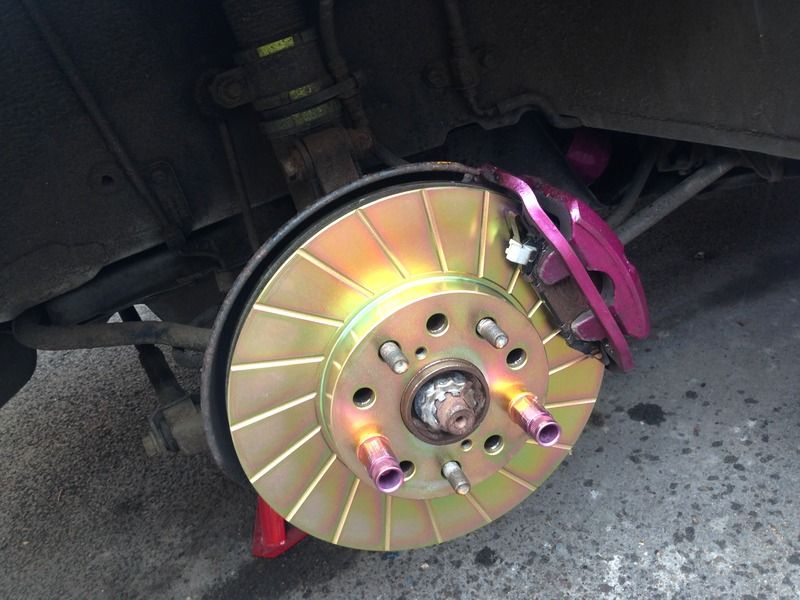
Unfortunately, the great British weather then took a turn for the worse, and we had to cower in the garage whilst the wind and rain blew over...
About 30 minutes passed and the rain eased up enough to start up again... the fronts were then removed, cleaned up and re-greased and everything we again re-fitted:
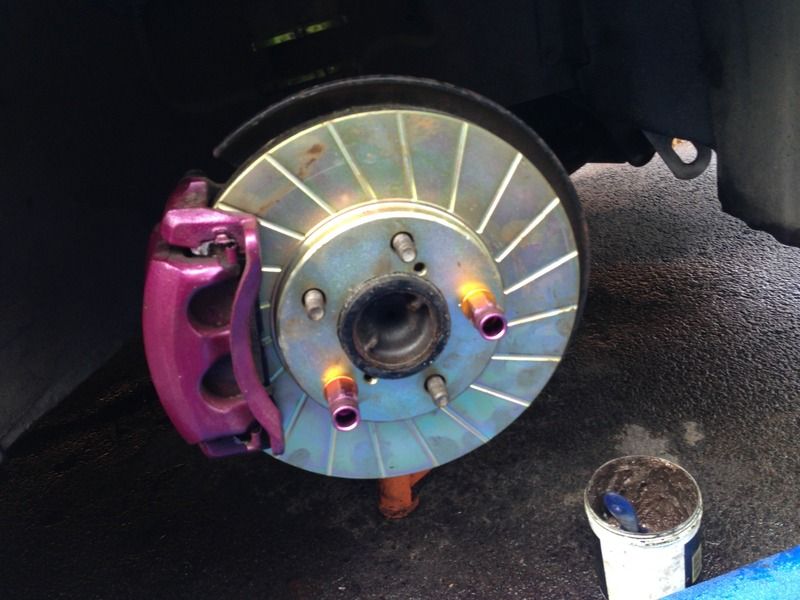
Fully fitted:
Whilst the wheels were off, I gave them a good clean, and also managed to fit some new aluminium spigot rings;
At this point, were going to make a start on the braided lines, but the first brake line we tried to remove started to very lightly round off the hexagonal fixing. We decided that a bit of heat was required, of which we didn't have any means at hand, so rather than keep trying and ruin something, we left this for another day... that also meant that we left bleeding the system for another day as the only fluid we had to hand was the HKS stuff that I didn't want to waste.
------------------------------------------------------
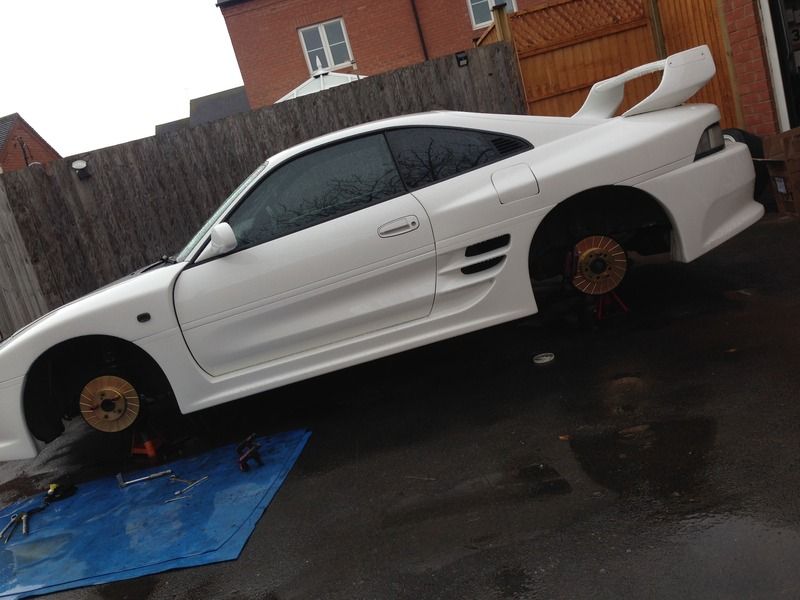
One last thing I've been meaning to do for a long time was to lower the front of the car... there's a slight look of tractor about it at present with the front arch gap much bigger than the rear... measuring it at 12mm gap at the rear, and 32mm and front...
Before:
As I have adjustable coilovers on the car, it was a fairly easy job to drop it down... I wanted to go 20mm, Dad advised against it just in case it started to foul the wheelarch when travelling over bumps and suggested 10mm to start with... we compromised at 15mm
After:
I doesn't look much in the photos, but the difference in the flesh is much better... now that the suspension has re-settled, the gaps are almost identical
-----------------------------------------------------
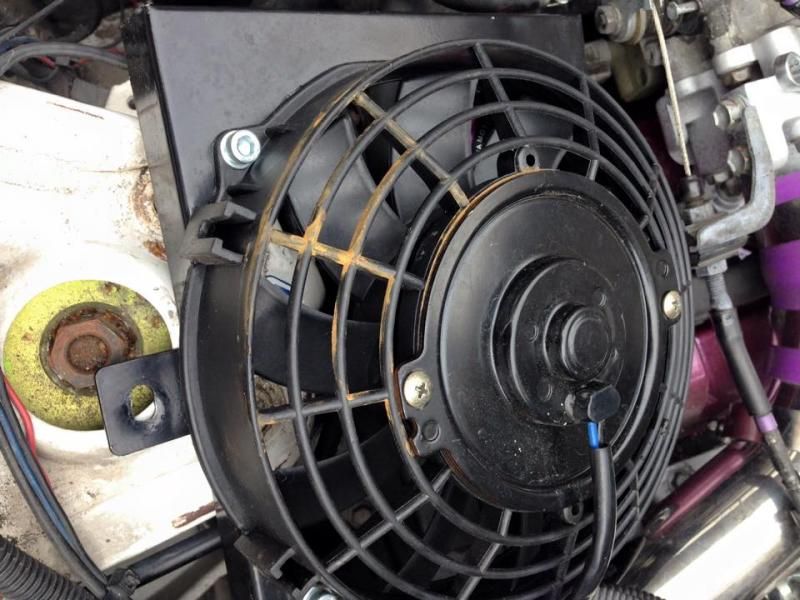
I had a warning light on my dash a couple of months ago stating the engine bay fan had ceased working... I took it apart to find the spal fan had rusted solid

...as a quick fix, I span it by hand which seemed to free it up. I fitted it all back together and it seemed to stay working. However, not very happy about how much longer it was going to last I ordered a new fan.
The new fan arrived a couple of weeks ago, and in preparation to fitting it I removed the old fan and intercooler ready to solder the existing plug onto the new fans wiring...

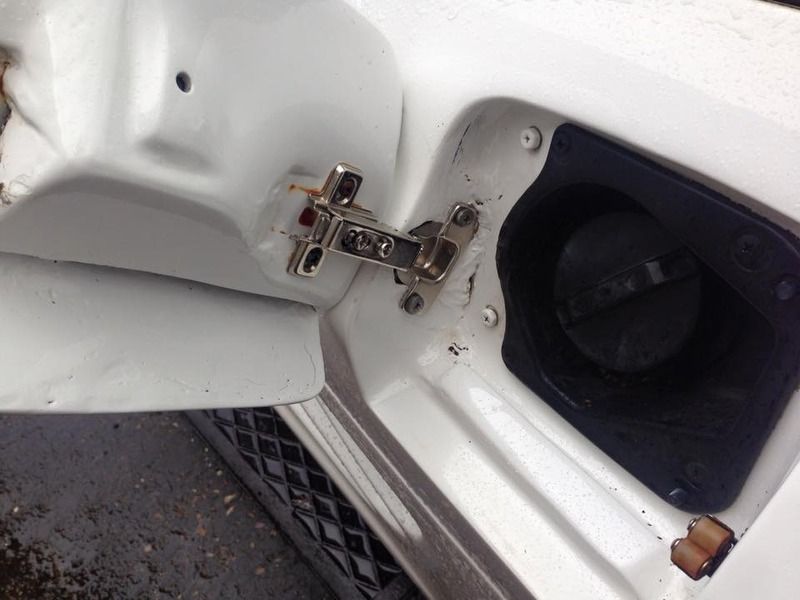
Another little thing that was bothering me was the hinge for the fuel filler flap on the TRD kit, it was rusted and not very nice to look at...
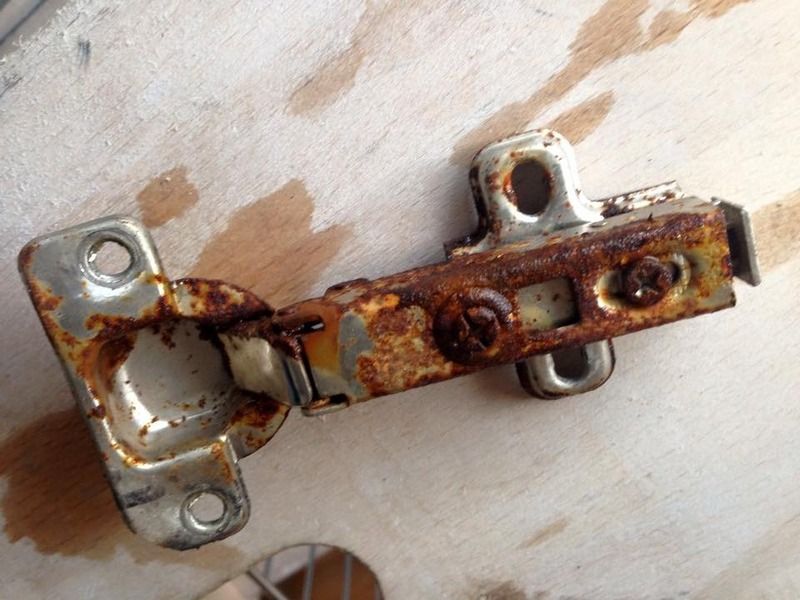
I had some new kitchen hinges in the garage, so I removed the old one and cleaned everything up around the filler cap, then fitted a new hinge, and it now works faultlessly again...
firstly, I want to return my dash to a stock look, so I needed to find somewhere to relocate the AVCR control unit.
There are a few of these types of things knocking around, and I got my inspiration from this style:
I had a spare grey interior light unit from when I changed over my headlining, sun visors and light to black and decided to try and get it fitted in there.
Once I had the initial design finalised, I broke out the fibreglass and resin and made the finished part.
Once it was smooth and correct, it had a few coats of matt black paint to finish the look and to complement my black headliner and sun visors.
Looks just like it was meant to be there.
One last thing to worry about is to get some LED lights fitted in it at some point in the near future, something for another day though.
With the highland drive fast approaching
Here's a few little bits that arrived the week before that were due to be fitted:
So, we started well, got the car in the air and removed the rear brakes.
Unfortunately, the great British weather then took a turn for the worse, and we had to cower in the garage whilst the wind and rain blew over.
About 30 minutes passed and the rain eased up enough to start up again.
Fully fitted:
Whilst the wheels were off, I gave them a good clean, and also managed to fit some new aluminium spigot rings;
At this point, were going to make a start on the braided lines, but the first brake line we tried to remove started to very lightly round off the hexagonal fixing.
One last thing I've been meaning to do for a long time was to lower the front of the car.
Before:
As I have adjustable coilovers on the car, it was a fairly easy job to drop it down.
After:
I doesn't look much in the photos, but the difference in the flesh is much better.
I had a warning light on my dash a couple of months ago stating the engine bay fan had ceased working.
The new fan arrived a couple of weeks ago, and in preparation to fitting it I removed the old fan and intercooler ready to solder the existing plug onto the new fans wiring.
Another little thing that was bothering me was the hinge for the fuel filler flap on the TRD kit, it was rusted and not very nice to look at.
I had some new kitchen hinges in the garage, so I removed the old one and cleaned everything up around the filler cap, then fitted a new hinge, and it now works faultlessly again.
-
Chris_9011
- Posts: 510
- Joined: Thu Apr 26, 2007 10:32 am
- Location: West Midlands
Re: Chris' Rev4 TRD Turbo...
Thanks Craig, yeah it's getting there... a few more bits to do to it and I think I'll be happy overall
Another modification done today though first...
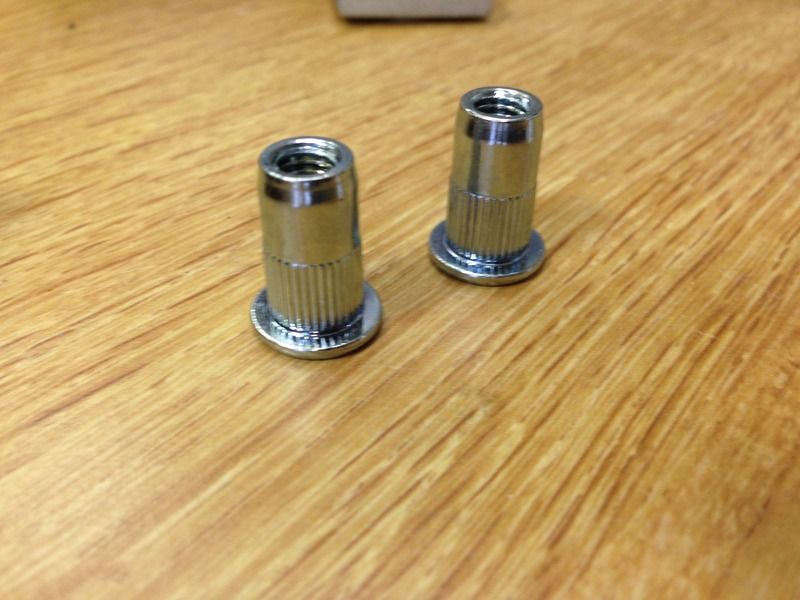
A little alteration to my XS Power intercooler whilst it's off the car... one good thing about working in the R&D department for a fastener manufacturer is the free fasteners available at my disposal...
I got tired of trying to hold the locking nut on the back of the tabs on the intercooler with one hand, whilst trying to tighten/un-tighten the holding bolts with the other in an impossibly small space, one simple solution was to add some RivetNuts to the assembly...
Knurled RivetNuts to give added rotational resistance:
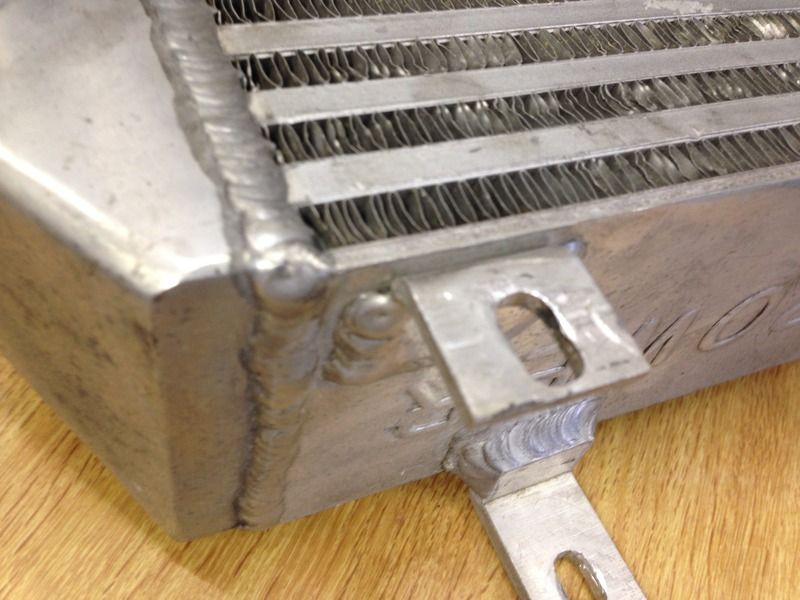
Standard hole in the intercooler:
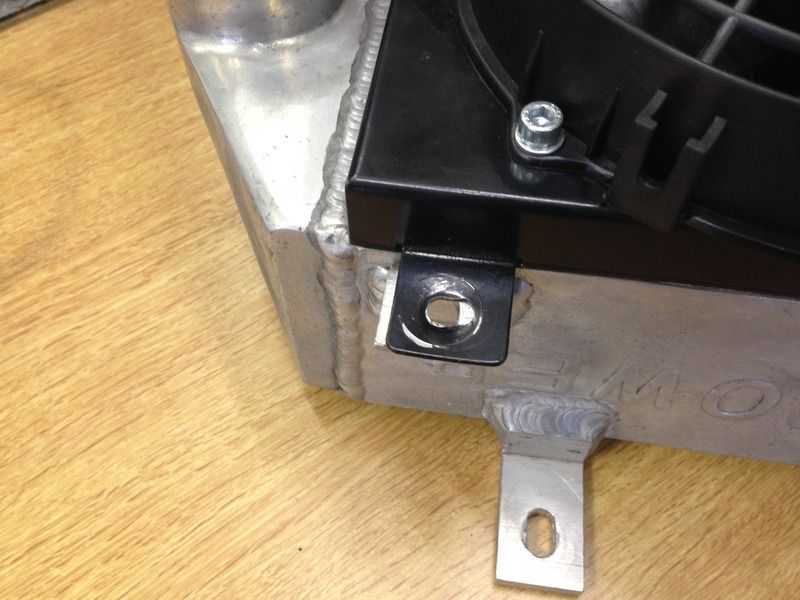
The complete assembly, black spal fan frame to be held in place with a nut and bolt:
add a RivetNut in each of the 3 locations:
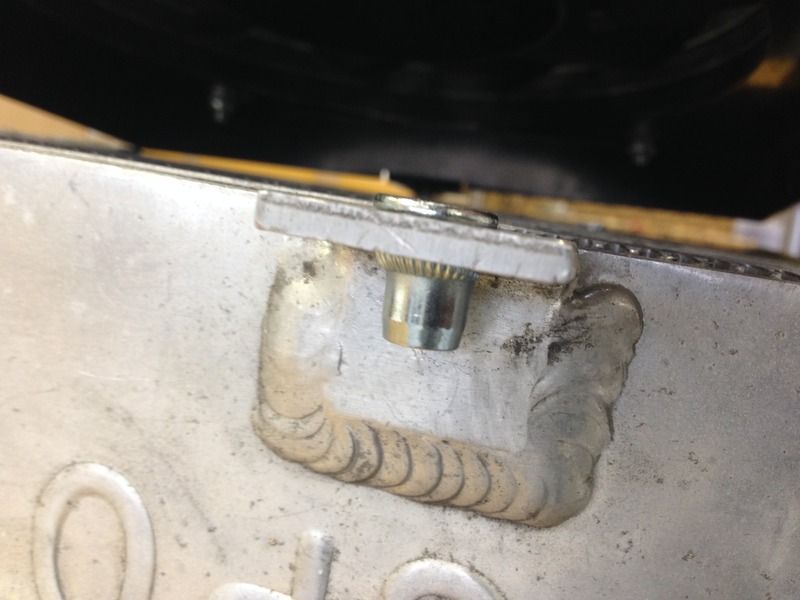

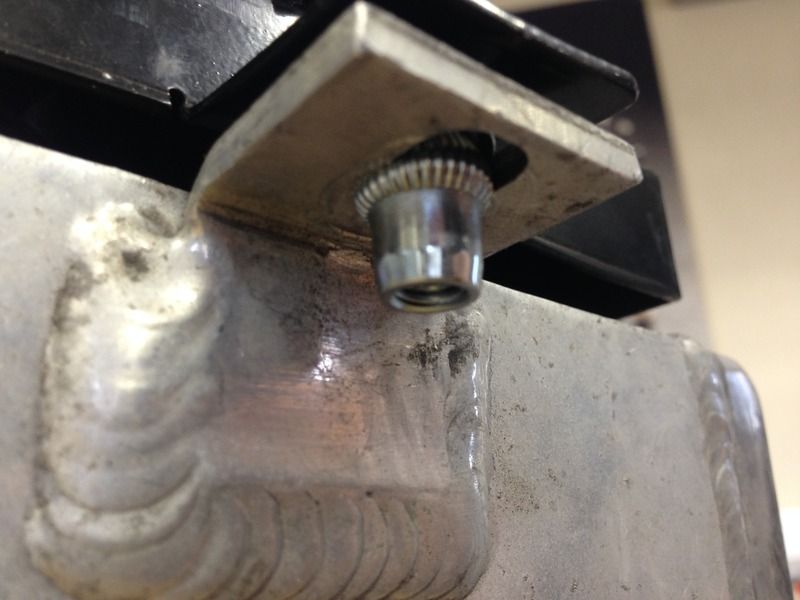
makes for an easier assembly when putting back on the car(bolts not tight in this photo)...
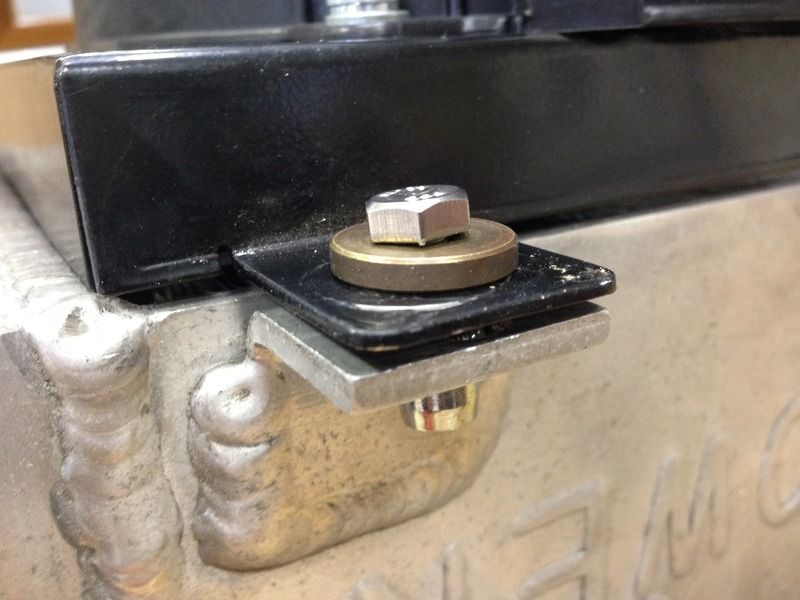
...a simple but effective modification
Another modification done today though first.
A little alteration to my XS Power intercooler whilst it's off the car.
I got tired of trying to hold the locking nut on the back of the tabs on the intercooler with one hand, whilst trying to tighten/un-tighten the holding bolts with the other in an impossibly small space, one simple solution was to add some RivetNuts to the assembly.
Knurled RivetNuts to give added rotational resistance:
Standard hole in the intercooler:
The complete assembly, black spal fan frame to be held in place with a nut and bolt:
add a RivetNut in each of the 3 locations:
makes for an easier assembly when putting back on the car
Re: Chris' Rev4 TRD Turbo...
Lovely car. Has helped me decide what I want in my next mr2!!