Project card melter...AW11SC Rebuild...pic heavy

Discussion and technical advice for 84-89 AW10 & AW11 MR2. 3A-LU, 4A-GE, 4A-GZE.

Moderators: IMOC Moderators, IMOC Committee Members

coanda
Posts: 512
Joined: Wed Apr 15, 2009 8:22 pm

Project card melter...AW11SC Rebuild...pic heavy

Post by coanda »

I've posted a little recently for advice on a couple of things. I guess I have enough to get a thread going.

So I've had my supercharger for a couple of years now. I drove it for about 9 months as my daily through an Autumn-Winter-Spring. She held up really well through all weathers and I enjoyed getting to work in the snow - easier than the Cayman I had before it thanks to the narrower tyres.

Here she is in the snow....December 2010

Image

Late April 2011 rolls around and we decide to do a driving holiday up to and around North Scotland. In short we couldn't get the kit in the MR2 and we can't use the roof rack on a T-bar. I didn't want to take the better half's Mini Cooper S, so it was time for a new car :) it was a toss up between a 996 911 and an NSX. In retrospect I wish I'd gone for the NSX for various reasons but, the 911 won out (I think it was because this one ticked nearly all the right boxes and there weren't any NSXs out there at the time that I fancied).

So, quite quickly this became the daily...

Image

And did 1700 miles around the country in two weeks. Essentially its been a great car that gets a bad reception on the road and the parts and labour cost a bomb. And the sound...it's just terrific with the sports exhaust. She's used all my savings up running her for two years and 35k miles so she'll be off soon. But I've been saying that for a while! :lol:

There's been lots of umming and arring and tooing and froing about what's going to replace the 911. I wanted something that wouldn't be financed (so less than 5k) so I could save up for a decent deposit on a GT86 next year (or pay off debt for a new house...depending on who you talk to...). Eventually I remembered I had a garage full of MR2 and it couldn't be too much trouble to sort, could it? I mean...how hard can it be?!

I'd already made inroads in to assessing the condition of the easily removable stuff and it wasn't looking too brilliant...

Rotted rear crash bar only half fixed to car...
Image

Image

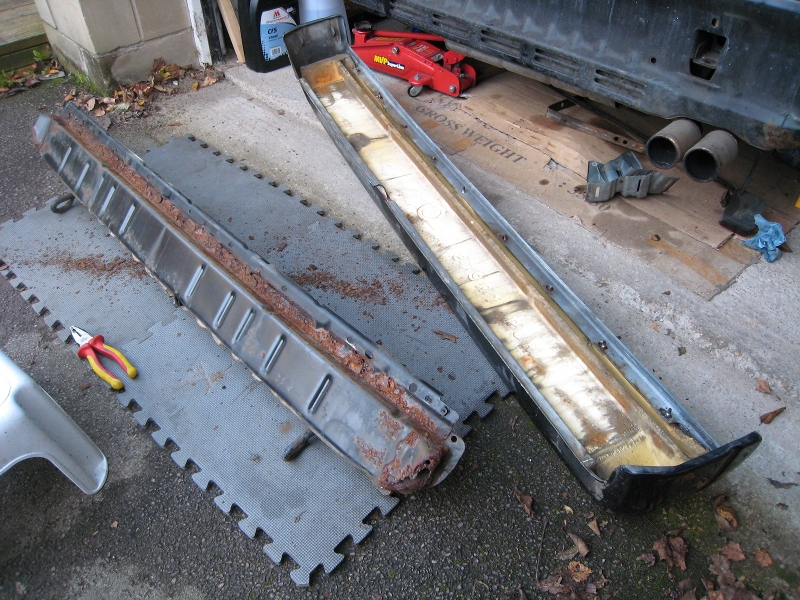
And a front crash bar, oddly warped front bumper and no crash bar attachment bolts so I could just pull the bumper assembly off...
Image

A little filler blending in the splitter...
Image

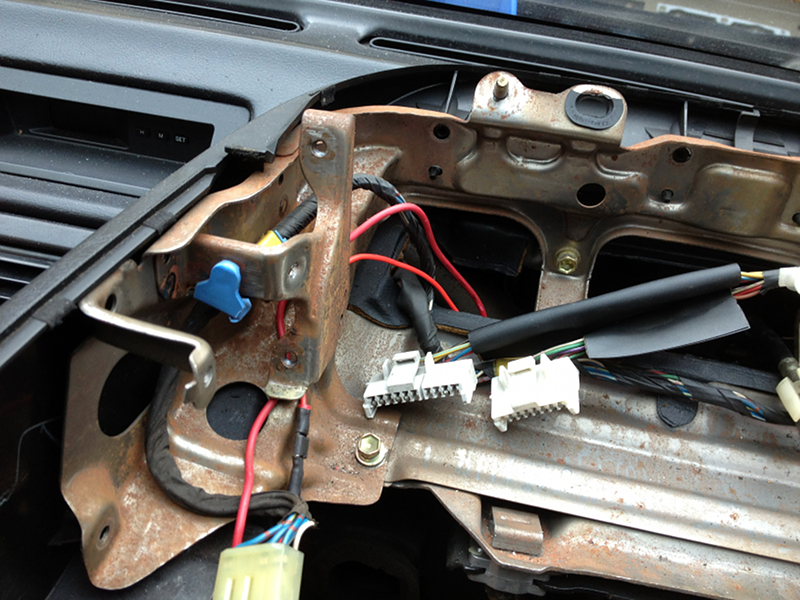
Radiator support bar is pretty much shot...
Image

And why is it at such a funny angle? Oh yeah, the radiator support bar has been driven in to something and has half come off the front of the chassis. not easily seen her but it took me a while to figure out why the radiator wasn't perpendicular to the chassis frame.
Image.

New rad as well. I think if I had the time all that rust would come off, because the rad support bars cleaned up OK in Deoxy. Gonna go for a modern fan wired in to the circuit to replace the two fan set up. I have a better cowl and fan assembly but would prefer the modern fan as there'll be more space behind the fan to dissipate hot air. I think it'll flow more air than the two old school fans and will do so more quietly - but can't prove that yet.

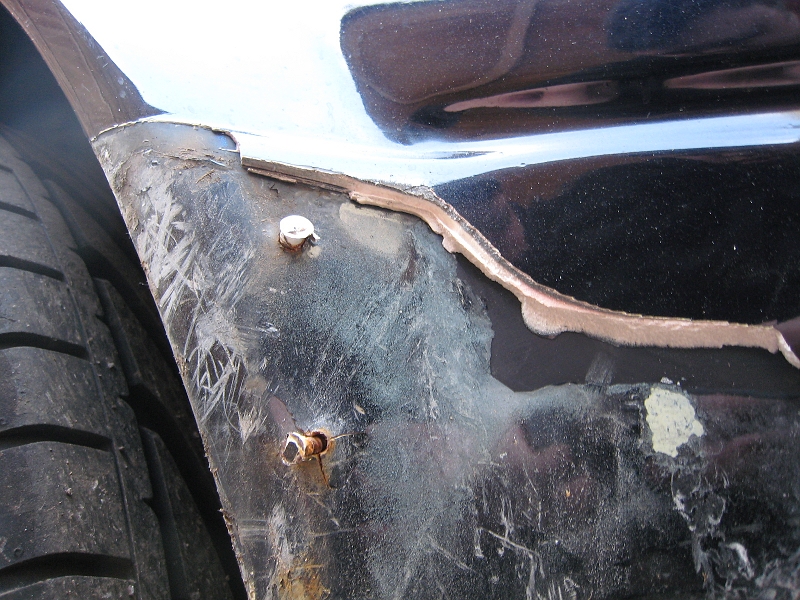
Going around the car, there's what looked like a bit of rust on the offside rear corner, perhaps just a bit of discolouration from standing outdoors for a while...
Image

But no. Some angry grinding later, we have this:
Image.

And the nearside sill connector has also been on a bit of a diet:
Image.

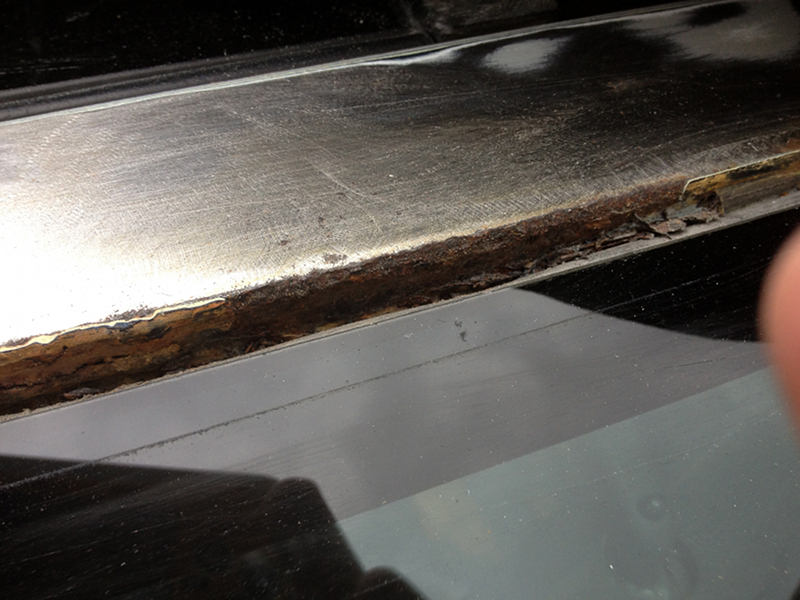
The top of the windscreen had free and easy access to water so that needs fixing and water proofing too
Image

Turns out that the offside sill connector has been repaired (to an ok standard) at the same time as welding over the drivers side aft floor bung and is still ok. The rust brown is just water staining on the sound deadening. I've painted the passengers floor up to the sill height in black POR15 and will do the same to the drivers side just to stop water getting under the sound deadening.
Image

I set myself the deadline of making it to Japfest this year. I've been trying to get there for 5 years now and I only live 10 miles away!

The strip down has been in process for some time now but got really busy in the last couple of weeks. I've got to keep the car running to get it in and out of the garage as the drive has a slope on it, and I've found out that you don't need any dash for the car to start and run!

The interior and all the exterior trim etc are currently spread all over the house, and the car is quite bare.

The chassis will be taken away for two weeks for bodywork and paint from next monday and my next challenge is to get the engine/gbox out before the car leaves so that I can work on that whilst the car is away.

More posts on different areas to follow...
Last edited by coanda on Mon Apr 01, 2013 11:42 am, edited 1 time in total.
coanda
Posts: 512
Joined: Wed Apr 15, 2009 8:22 pm

Re: Project card melter...AW11SC Rebuild...pic heavy

Post by coanda »

Reserved for interior jobs log...
coanda
Posts: 512
Joined: Wed Apr 15, 2009 8:22 pm

Re: Project card melter...AW11SC Rebuild...pic heavy

Post by coanda »

Reserved for exterior jobs log...
coanda
Posts: 512
Joined: Wed Apr 15, 2009 8:22 pm

Re: Project card melter...AW11SC Rebuild...pic heavy

Post by coanda »

Reserved for engine jobs log...
coanda
Posts: 512
Joined: Wed Apr 15, 2009 8:22 pm

Re: Project card melter...AW11SC Rebuild...pic heavy

Post by coanda »

Reserved for mods log...
coanda
Posts: 512
Joined: Wed Apr 15, 2009 8:22 pm

Re: Project card melter...AW11SC Rebuild...pic heavy

Post by coanda »

Reserved for suspension jobs log...
pk_090
Posts: 1968
Joined: Fri Jun 03, 2011 9:39 pm
Location: Stoke on trent, staffordshire

Re: Project card melter...AW11SC Rebuild...pic heavy

Post by pk_090 »

You need a slap for not buying an NSX!
platmatt8 wrote:Lauren has got bigger balls than most men on this site

charged wrote:Mine's probably screaming 'stop raping me' :D
coanda
Posts: 512
Joined: Wed Apr 15, 2009 8:22 pm

Re: Project card melter...AW11SC Rebuild...pic heavy

Post by coanda »

Yeah I know.....in my defence I reckon the parts for big bits on the NSX are as expensive as the 911 and are harder to come by. I'd also hate to think how the NSX suspension would deal with the condition of the roads I use whereas the 911 just shrugs them off. Bent ally suspension is not something I'm looking for!

Anyways, I'll have one for Fridays and weekends. Just got to realign life a little first.
coanda
Posts: 512
Joined: Wed Apr 15, 2009 8:22 pm

Re: Project card melter...AW11SC Rebuild...pic heavy

Post by coanda »

I was going to fill in the reserved posts with jobs for different areas but decided that it wouldn't work very well (note to self: don't make threads at 3am). Mods can you delete the silly reserved posts please?

OK, so the cabin has been disassembled down to the crash bars and air con bits and pieces which I'll leave alone.

That means a lot of cleaning and tidying up. An APC solution is used to clean all of the components.

Now the work is split two ways. If the plastics have suffered in the sun or in use I have given them two coats of a 'liquid plastic' spray from frosts which seems to come out OK - but quite matt. If the plastics were looking ok they were coated with aerospace 303 and put safely in a box out of the way of dust, cats and greasy hands.

Not really much to show picture wise with this job, but here's a crappy picture of the passenger side kick panel split into it's two components and getting sprayed with the black plastic spray. I think you can see the matt finish in this one.

Image

One of the jobs I have enjoyed is reinstating the colour in parts with engraved lettering and pictures, and enhancing things a little here and there.

From:

Image

To:

Image
I've since changed the red to orange.

And from:

Image

To:

Image

Originally done in black acrylic, I didn't think it covered that well. I've since redone this in black satin enamel - looks much sharper now.

The metal structure of the dash had surface rust on most of it and doesn't appear to be protected in any way, so I've taken off what I could including the bits in this pic here:

Image

(including some inspiration, both visual and liquid in form....this thread is brought to you in association with Dr Pepper and Late Nights!)

As well as the central dash display chassis plates:

Image

And the instrument panel cage here:

Image

This has all been treated with hot deoxy solution and it was all minor surface rust so it came off very easily with a little wet sanding in the solution. Generally the solution will loosen the rust but it will stay in place on the part unless it is agitated away. The sanding does that very effectively.

In the first pic of the metal bits you'll see a small tub like piece of metal which usually holds the lighter fitting. on the central armrest. That had suffered and needed some work to bring back up...

Image

I suppose it might have been due to damp and broken edges where the lighter fitting passes through because the 12v plug is in perfect condition.
coanda
Posts: 512
Joined: Wed Apr 15, 2009 8:22 pm

Re: Project card melter...AW11SC Rebuild...pic heavy

Post by coanda »

One of the other jobs that's in process at the moment is making tie bars for the front bumper joints.

As you'll know, the bumper skins are attached at multiple places either by tightening nuts on studs which pass through a joint of bumper skin and structure or by bolts that pass through the bumper/structure into captive nuts in the crash bars.

Seems like the original bars are made of really crappy steel that's really prone to rust. the studs aren't much better.

I'm replacing the steel studded bars with ally strip bars + ally rivnuts. I've bought stainless steel bolts and washers to complete the joint. I'll need to make holes in the bumper foams to accept the rivnuts but they'll act as good locations for the bars. The studs help with locating the joint but I don't think using rivnuts is the end of the world.

So here's a couple of pics:

Image

Image

The anodised aluminium plate is from wickes and they happen to do a size around about the same width as these short bars (either side of a long bar at the top of the front bumper). The long bar on the top of the front bumper has a subtle curve to it so I think I'm going to heat up the ally strip and bend it to match. These M6 rivnuts need a 9mm hole drilled so the correct spots were centre punched, pilot drilled and then drilled out for the rivnuts to be inserted. The strips are rounded with sanding barrels on my little dremel type drill.

I just heard my new wheels got shipped today - v excited!
Charged
IMOC Committee
Posts: 8897
Joined: Fri Sep 02, 2005 8:09 pm
Location: Herts

Re: Project card melter...AW11SC Rebuild...pic heavy

Post by Charged »

I love the little interiors bits and bobs, great detail

so, Japfest 2014? 15? :D

Good luck with it all :thumleft:

PS, if I saw you at a junction , in zie porker, I probably wouldn't let you out either :mrgreen:
If you can't see the angle, you're in trouble.
coanda
Posts: 512
Joined: Wed Apr 15, 2009 8:22 pm

Re: Project card melter...AW11SC Rebuild...pic heavy

Post by coanda »

Lol - letting people out at junctions. What a quaint notion that is these days!

Japfest 2013! I love a challenge.
coanda
Posts: 512
Joined: Wed Apr 15, 2009 8:22 pm

Re: Project card melter...AW11SC Rebuild...pic heavy

Post by coanda »

Took the main dash panel, glove box lid and frunk carpets to a local autotrimmer yesterday. I originally thought that the dash was vinyl covered but it turns out its plastic. Autotrimmer said it was injection moulded but it's too thin for that so it looks like its vacuum formed sheet plastic. It's showing its age and the plastic is now very brittle so thats getting recovered with a leather type material that looks ok. Gonna be a couple of weeks before thats done now.

Yesterday I also tidied up the drivers side electrics and painted the floorpan with POR15.

I also had a look under the central tunnel covers and everything looks in v good condition under there so thats something else ticked off the list.

Fedex got the alloys to the uk overnight so I should have them soon enough. Then I'll enjoy the wait for the customs letter!
elbon50
Posts: 3598
Joined: Sat Sep 12, 2009 10:29 am
Location: Stafford

Re: Project card melter...AW11SC Rebuild...pic heavy

Post by elbon50 »

What alloys have you bought Coander ?
coanda
Posts: 512
Joined: Wed Apr 15, 2009 8:22 pm

Re: Project card melter...AW11SC Rebuild...pic heavy

Post by coanda »

I want to keep the wheels a little secret for now but...one of the styles from this picture...

Image
elbon50
Posts: 3598
Joined: Sat Sep 12, 2009 10:29 am
Location: Stafford

Re: Project card melter...AW11SC Rebuild...pic heavy

Post by elbon50 »

MMMMMM yes I do like those :thumleft:

(Quite like the car they're on too :) )
stenky
Posts: 356
Joined: Wed Mar 23, 2011 9:04 pm
Location: Slovakia

Re: Project card melter...AW11SC Rebuild...pic heavy

Post by stenky »

i like the attention to detail. thought about making bumper brackets like these some time ago too :thumleft:
Image
coanda
Posts: 512
Joined: Wed Apr 15, 2009 8:22 pm

Re: Project card melter...AW11SC Rebuild...pic heavy

Post by coanda »

Engine and gearbox are out!

Slightly unconventional, bit more and pics later on.
coanda
Posts: 512
Joined: Wed Apr 15, 2009 8:22 pm

Re: Project card melter...AW11SC Rebuild...pic heavy

Post by coanda »

I owe this thread many words and photos.

I'm suffering with 3 infected teeth and irritated nerves in the face so I'm in need of a bit of a boost.

The car came back on Monday from the bodyshop and I think they've done a good job of it.

I thought I'd test fit one of my new wheels.

I put them on with their hubcentric rings and I had a bit of a shock...
Image

GAAAAAAHHHHHHH!!!

They stick out a bit more than I expected! Then I had a poke around, and realised that the wing would sit further out. Aligning the bolt holes at the front of the wing really helps!

Image

That's better!
elbon50
Posts: 3598
Joined: Sat Sep 12, 2009 10:29 am
Location: Stafford

Re: Project card melter...AW11SC Rebuild...pic heavy

Post by elbon50 »

Looks promising

Shiney bodywork & nice new wheel :)

More piccies please \:D/
Post Reply

Return to “MR2 MK1 1984-1989 NA & SC”