Here's the latest Jimi modification for the MK1
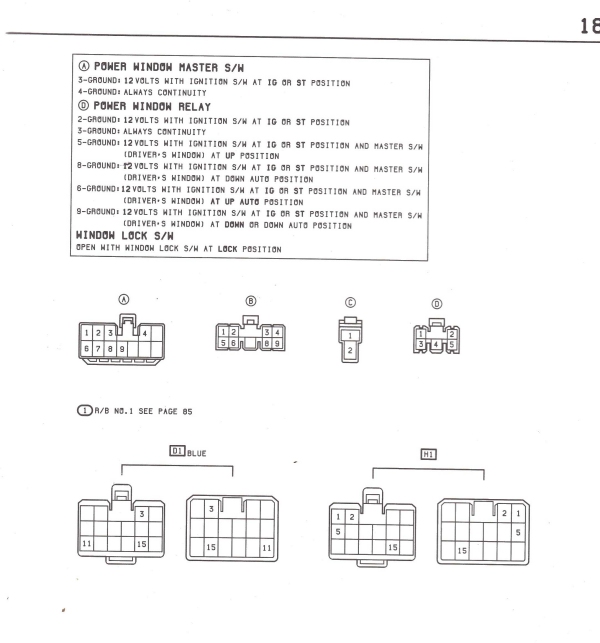
Most of you will have seen the Auto Up mod for the drivers window which is fairly straight forward.

However due to the odd way Mr T did the wiring to the passengers window
(no relay, the switches carry the full motor load) the passengers side is a bit more awkward.
I figured out how to do this a couple of years ago, but it meant putting in a separate switch, and couldn't find a suitable switch that looked right and could be fitted on the door controls.
I like my mods to be unobtrusive and subtle so you don't know they are there.
So I never took it any further at the time, just put it on the back burner.
A couple of months ago while out for a run in the car an idea popped into my head.
I'm usually in the car myself with the T-bars off and the windows down, I very rarely have the passengers window in a intermediate position, it's either up or down.
How about using the existing passengers switch on the drivers side to give me the auto up/down function on the passengers window and have the normal function from the passenger side door switch
? a look at the diagrams showed that it looked quite possible.
Had a go at it the other day and it works fine.

This is what I have now:-
Press and release
( you no longer have to hold it
) the passengers window switch on the drivers door, passengers window goes fully up or down depending on the direction you choose.
The passengers door switch operates the window as normal.
Only
2 downsides to this mod
1.
I can't partially open/close the passengers window from the drivers side controls, it's either up or down.
2.
The window lock button on the drivers side controls
(which only locks the passengers window) no longer works
.
.
.
.
.
no loss on either point as far as I'm concerned

Upsides are
I get the kind of control of the passengers window I wanted
Using the relay takes the motor load off the existing switches, they'll last a lot longer.
It's unobtrusive and subtle, you can't tell from looking anything has been changed.
 What you will need
Another power window relay
(gray relay from drivers side door) modified with the extra diodes for auto up mod.
The plug for the relay with as much cable attached as you can get.
This is optional, it quite possible to wire it up without the plug using suitable cable and crimp connectors or soldering
Another plug
+ cable for the passengers door window switch.
This is optional, it quite possible to wire it up without the plug using suitable cable and crimp connectors or soldering
Notes
If you make the connections to the existing switch plug using flat pin crimps then the mod can easily be reversed.
If you don't have the plugs then the connections to the relay and switch can be made with small spade crimps, again makes the mod easily reversible.
In the picture Power Windows_0002cs.jpg
plug B is the relay, plug D is the switch, pin-outs are shown looking at the front of the plug
(NOT from the cable side)
Wire colour codes are
L
= blue
G
- green
R
= red
L-R
= blue/red
W-B
= white/black
(this is earth)
G-Y
= green/yellow
G-O
= green/orange
G-R
= green/red
G-W
= green/white
I used one of the brackets from the power window relay to mount the new relay in the door using the bottom securing bolt for the door lock relay
(green) which is already mounted on the door.
Make sure the new wiring and relay is clear of the window when it's fully down.
Picture Power Windows_0001as.jpg shows the standard wiring
How to do it.
1.
Remove the passengers door card
2.
Wire up the relay to the existing switch plug as shown in Red on Power Windows_0001bs.jpg
3.
Wire up the new switch plug as shown in Yellow on on Power Windows_0001bs.jpg
4.
Refit the door card
5.
Play with it to your hearts content
.
.
.
.
.
.
.
.
.
.
.
job done.


Enjoy
Jimi
