
In any vehicle running forced induction it's wise to have a gauge present to indicate the pressures being created. Although the MkII Turbo has a gauge fitted as standard, it's not very useful as it has no measurements. Useful in a stock set-up and essential when running increased boost, consider the fitment of an aftermarket boost gauge which indicates the pressures being achieved, whether in PSI or Bar.
These instructions are specific to mechanical boost gauges as opposed to electrical ones. Mechanical gauges are generally cheaper and the more common of the two types. If anything is unclear then feel free to look me up and get in touch.
Before you begin it's wise to read these instructions thoroughly. This way you'll be comfortable with what you need to do and aware of the parts you need. Naturally, if you're confident enough and want to change the install method in parts then that's fine however if you have no experience in this field then these details will get your gauge installed and very tidily too.
Now, prior to taking the car apart I also suggest you decide where your gauge will be positioned. The location of a boost gauge can be a little science -- ease of install versus quality install versus ease of seeing it! There's power to consider as-well -- more than likely your gauge will illuminate (hint - consider the cigarette lighter for this.)
PARTS REQUIRED
1 x boost gauge
5 x metres rigid nylon pipe
1 x metre flexible silicon pipe
1 x T-piece connector
1 x elbow connector
1 x wire coat-hanger (optional)
Selection of cable ties (optional)
See appendix A for details on the above parts. Note that some short lengths of pipe may be surplus after the install.
THE PRESSURE'S BUILDING
Okay, off we go! Hopefully you've picked a nice day to do this -- 2 hours should be enough time. Open your driver's door, engine lid and boot lid.
Inside the cabin, remove the driver's side door sill/trim. This is a long piece of trim which is secured by a plastic screw at the foot-well end and numerous plastic studs.
Remove the plastic screw and then pull the rest of the trim up (I recommend you get your fingers right underneath to locate the studs rather than pulling and bending and possibly damaging the plastic.) Put the trim to one side and fold back the exposed carpet.
Next you need to remove the driver's side rear trim section (it covers the rear speaker and houses the engine lid release) but there's a pre-requisite to this. Lift up the lid of the adjacent box unit and take it off by removing the 3 screws at the hinge. You then need to remove the two exposed studs which hold the side trim to some metalwork there (on the left.) If there's a black container in the way then this comes out by removing studs as-well, located at the top and at the front.
Back to the side trim, remove the engine lid release surround first (held in by a screw) then pull the trim away. Again, it's held in with plastic studs so be careful not to damage the plastic by bending too much.
Now locate where the boot release cable runs from the cabin to the rear of the car (usually surrounded by sponge.) If you've got small hands then you may be able to avoid removing the seat-belt mechanism for the next steps, but I doubt it.
The seat-belt mechanism unbolts quite easily but don't let it roll-up towards the pillar. Ideally you want to pull the mechanism away from the pillar and secure it out of the way. It's been known that if allowed to roll-up it can be very hard to pull the mechanism back down again which isn't good.
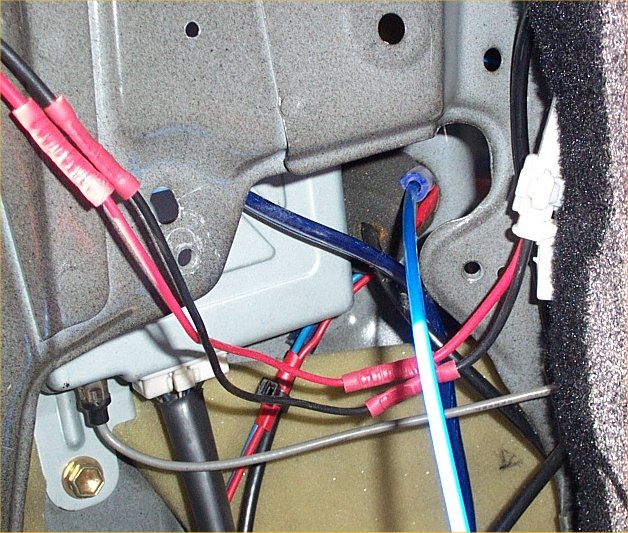
Take one end of your length of nylon pipe and feed it through towards the rear of the car, pushing it between the metalwork and the sponge which surrounds the boot release cable. Aiming upwards, push most of it through leaving about 12 inches remaining in the cabin.
Cut a 4 inch length of silicon pipe and push it onto the nylon pipe. Slide the silicon pipe down and push it into the hole in the metalwork to prevent possible chafing and crushing (albeit unlikely.)
Pop round to the boot and pull down the carpet which covers the aerial mast unit and boot wall. You may need to 'carefully' remove the securing pins if they're present.
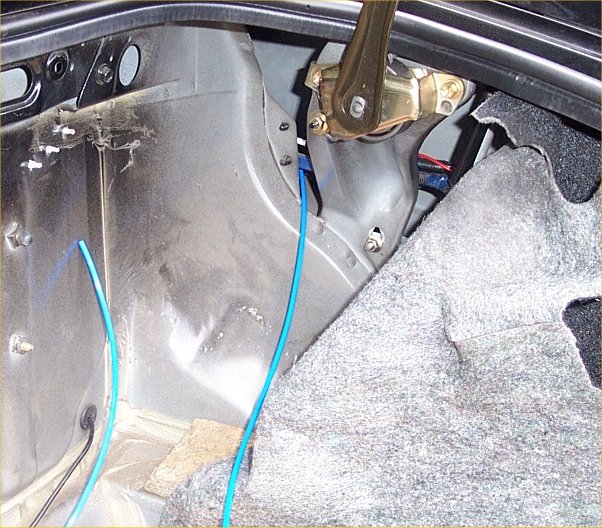
Take your wire coat-hanger and make it into a long hook. Here comes the fun part -- feed your hook around the back of the aerial mast unit and towards the front of the car.
We're aiming to grab part of the pipe so when you pull the hook back the pipe will come with it (we fed lots of pipe through to increase the chances of a catch.) Once you have snared the pipe pull it through gently making sure you don't pull through what's left in the cabin!
Locate the grommet which sits bottom right hand corner of the boot wall. Push your nylon pipe through it and into the engine bay. From the engine bay pull the pipe up to engine lid height.
Locate your Turbo Pressure Sensor which is near the diagnostics box -- the sensor itself is black, the diagnostics box is grey. Looking at the engine from behind the car, it's on the right hand side, next to the boot/engine wall.
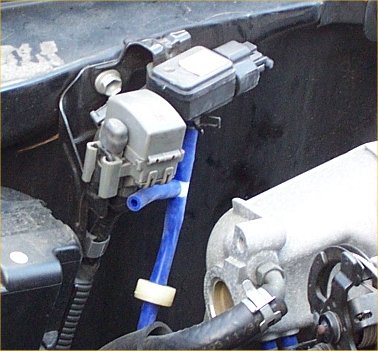
Spy the pipe which exits the bottom of the Turbo Pressure Sensor, remove the clip and disconnect the pipe by pulling it down. Usually this pipe will run for a few inches and then attach to a small, creamy-coloured filter. Don't worry if such a filter isn't present.
You want to T-in between the filter and the Turbo Pressure Sensor (or a good few inches below if you don't have a filter.) Cut the existing pipe and insert a T-piece connector. Although the connector will be barbed, you can secure the pipes with cable ties (optional.)
Cut a 2 inch piece of silicon pipe and position onto the middle leg of the T-piece connector (just like in the picture above.) Note - I've actually replaced the entire length of pipe-work which is why it's all blue.
Take the end of your nylon pipe and push it into the silicon pipe, butting up to the T-piece. Again secure with a cable tie if you wish. Re-seat the pipe-work onto the underside of the Turbo Pressure Sensor and secure with the clip.
Now it's time to make things a bit neater -- if you have surplus amounts of nylon pipe in the engine bay then pull it back thru via the boot, aiming for a nice tidy install in the engine bay.
From the cabin, gently pull back any surplus nylon pipe as-well -- this will take away any slack from the boot, aerial mast, and behind the firewall areas. Ideally you don't want to pull it too tight and make sure you don't forget to reposition your 4 inch length of silicon pipe.
Remaining in the cabin now, you should find you have quite a good length of nylon pipe left to play with. Trail this down from the seat-belt area towards the door sill, making sure it's loose and free to move. Run the pipe along the door sill using any existing cabling as a guide. Around the front bonnet release you can cut the pipe.
Cut 2 x 2 inch pieces of silicon pipe and attach both to your elbow connector. Insert the door sill section of nylon pipe into one end of the elbow connector (into the silicon pipe) and secure with a cable tie (optional.)
Depending on where you are going to position your gauge will affect this next part of the installation. Having my gauge in the corner of the dashboard I was able to drop down to the floor the last, cut-free section of nylon pipe (it's a lot easier to drop down than to push up!)
Taking the dropped end of nylon pipe, push it into the other end of the elbow connector like before. The elbow is ideal, allowing the pipe-work to change direction and be unplugged for any testing in the future.
With the other end of your nylon pipe possibly poking out the top of the dashboard, roughly position your boost gauge, trim the pipe accordingly and connect to the back of the gauge (following the manufacturer's instructions and using any necessary adapters they supply.)
For the pipe-work that's about it -- turn on the engine and make sure the needle jumps from zero to a negative value. Blipping the throttle you should find the needle jumps up and down. If the needle doesn't respond then check your gauge and pipe install for problems/leaks.
If your gauge doesn't have a light or you've already wired it in then you can skip this next section.
LET THERE BE LIGHT
Most boost gauges will light up but need power to do so. An ideal place to get power from is the cigarette lighter which illuminates when the side/dipped lights are turned on.
Lift up the gear gaiter and plastic base and rotate through 90 degrees to keep it out of the way. Remove the ashtray simply by opening the lid and pulling it up and out.
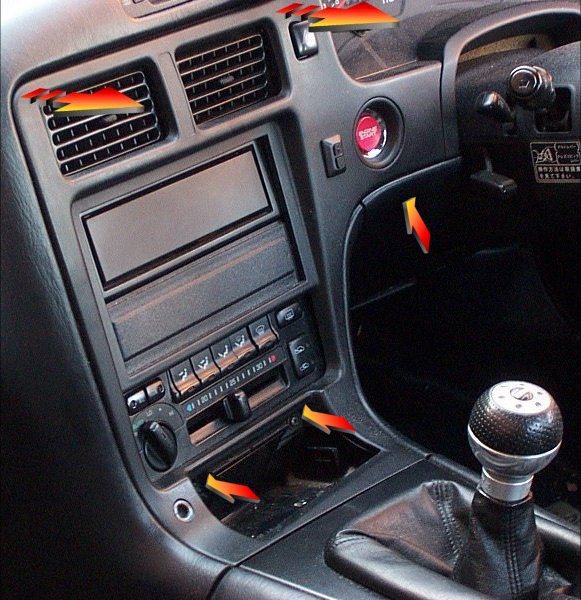
Remove the two screws which were exposed when you removed the ashtray (indicated in the picture above.) Also remove the single screw which is to the left of the steering wheel. This will allow the securing trim to be pulled down gently and out of the way.
Remove the fascia by pulling towards the back of the car -- you'll need to give it a bit of a tug, especially near the vents at the top. Don't worry, it does come away but don't pull it away more than a few inches.
The fascia trim won't come completely away because the hazard warning button and cigarette lighter are connected to it. Disconnect the hazard button by pushing in the lug in the side of the connector. It then pulls out.
Disconnecting the cigarette lighter is equally as easy -- the power connector (cream) simply pulls off and the bulb twists slightly and then comes away. That's it. Place the fascia safely out the way.
Now with some basic electrical skills you can tap into the cigarette lighter bulb's +ve and -ve feeds using whatever method you choose, e.g. block connectors, crimp, solder, etc.
Check that your gauge illuminates when you turn the lights on. Reseat the connectors and the fascia trim along with the screws, etc.
FINISHING UP
With your boost gauge plumbed in you can now put everything back together. If you want to see the results before doing this then you MUST re-assemble the seat-belt BEFORE driving the car!
All pieces of trim simply reseat in the reverse way you took them out -- there are no special refit procedures. If you haven't already done so, securely mount your boost gauge in your preferred location.
When you go for a drive you should see the needle respond to the loads you exert on the engine and the pressures being created. It's great to see exactly what's going on!
That's it, all done. Give yourself a pat on the back.
APPENDIX A - DETAILS OF PARTS REQUIRED